Recently the Lumens company has updated its software for its famous Ladibug brand document cameras (Doc Cam). When Lumens decided to update from the earlier Queue to Ladibug software it was a huge transition for users to get accustomed to, but was also leaps ahead in the features that it offered. Now recently, the Ladibug software has gone through another transition as it has upgraded from version 1.1.. to version 2.0.3.
Let's take a look at the changes and talk about the Good things. One of the obvious changes that you will notice is that when you activate the software and hover over the Ladibug Icon you will only see a 4x4 grid. If you remember in the earlier version you hovered and saw a 3x3 grid and then had to click the Advanced button to see the 4x4 grid.
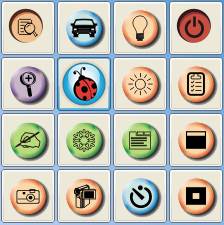 On the 4x4 grid there have been a couple of new feature icons that have been added for you to use along with the ones that you have become accustomed to.
 One of them is the Mask Mode, which is similar in look to a cover shade over the information. If you remember putting a sheet of paper over the overhead machines to block certain information you were sharing this will be the same, just through the software.
The other is the Spotlight Mode, which allows you to focus in on an area of the screen while blocking out the rest of the viewing area.
The biggest change that you will notice when you turn on the software that is completely different on version 2.0.3 is in the viewer window when you click the Display Live Image button.
 You will now see something extra, the Thumbnail Viewer, which is attached to the left side of the viewer window that offers some additional available options that you have not had the ability to do before.
Any images that you take with the Camera Button will display in the thumbnail viewer for you to use. To display one of the images, click the Thumbnail you want to use. To go back to the live image hover over the Ladibug Icon and click the Display Live Images button again.
Some of the other features on the toolbar are:
- You can Save the Image anywhere on your computer.
- Open a Directory of Images from your computer, CD-rom, Thumb Drive or other removable storage device to display inside of the Ladibug software.
- You can Delete items in the viewer that you do not want.
- You can also email images directly from the Ladibug software
Now you know whenever there is good I always seem to find something bad to go along with it. Well the only thing that I could find can count as both bad and ugly at the same time. The Delete feature is the culprit that has caught my attention. I said earlier that you can open a Directory of images and bring them into the document camera and use them in the software. Well you will need to make a copy of all of the images first before you open them in the Ladibug software. What happens is that the software does NOT create a duplicate of the image, it attaches to the original. Why is that bad you may be asking? Well it comes in when you want to Delete an image you no longer want to use. If you Delete an image that you have pulled from a Directory. It is permanently deleted from the original location. Yes gone for good, I learned the hard way believe me, I lost an image that I did not have a duplicate of.
So all in all the software update is great and so much more user friendly that its predecessor with the exception of the Delete feature. I would have to challenge Lumens to work on fixing the system so that it will duplicate the images when you open a Directory of photos to use in the software.