I know that this is a sore subject for everyone right now. We do not know whether or not money is coming into the schools or going out of the schools. So what do we do to keep up with the Jones' so to speak?
Let's take a look at some available options out there that can assist us in easing the pain. Yes I am talking about Grants if you have not already figured it out. There are many grants out there that can help you as teachers to get what you think is necessary to aid in student achievement.
So what is available, now for a while now I have been sharing a few Grants through our WSFCS wiki page, but I think I will also give you some more information here as well as those grants.
Upcoming and Current offerings:
The NEA Foundation is offering $5000 per award to improve student achievement. Available for all grades and universities to show students involved in critical thinking and problem solving skills. Find out more here. The deadline for applications is October 15, 2009.
Send your Teachers, yes teacher, to attend a Free math and science education camp. The Mickelson ExxonMobil Teachers Academy is taking nominations for teachers in grades 3-5 to attend a summer camp where they will learn ideas and experiments to take back to their classrooms. Find out more information here. The deadline for applications is October 31, 2009.
AverMedia is giving away, once a month, their AverVision CP300 gooseneck 3.2MP document camera. This contest coincides with their Teacher Forum where teachers share best practices for teaching with visual technologies. Find out more about the contests here. This is an ongoing application so no deadline.
Check out my upcoming posts on how to successfully search and write for grants.
Monday, October 12, 2009
Wednesday, September 30, 2009
Google Earth Real-time Animations
Remember what you said when you first saw Google Earth and Google Maps, you might have thought they were great to have as a utility. Especially due to the fact that they were updated more often then other options available at the time. Then Google Earth added a 3-D layer to the program that gave you additional features as well as the ability to create points of interest, etc. Then a little over a year ago Google Maps added its Street View option and many people thought that was a great feature while others immediately thought it was creepy.
There is more out there now and it is coming from the Georgia Institute of Technology. Students and faculty there have been able to design and adapt CCTV feeds into animated 3-D representations within the software. Now you will be able to see how heavy traffic is on the highway before you leave the office. Or you could see how many people walk through Central Park on any given day. You could even watch a football game or keep an eye on your child while they are playing in the park down the street.
Oh yes, the "creep factor" red light is going off with loud booming sirens on this one. But hey we live in a voyeuristic world where we have made TV history for highest ratings for shows like "Big Brother" and "Survivor." But I digress...
The official release will not be unveiled at the International Symposium on Mixed and Augmented Reality(ISMAR) in Orlando, Fla. which is held Oct 19-22. Take a look at the video below to get a quick sample of what their new technology.
Video provided by Ga. Institute of Technology
Sunday, September 27, 2009
Did U Know: Einstruction Mobi displays CPS data
Einstruction offers a new feature if you are using both their Classroom Performance System (CPS) and Mobi Interactive Tablet.
Einstruction offers a 2 inch KWIK view screen on their Mobi that allows you to seamlessly integrate your CPS data. As students answer questions on the response clickers the data is transmitted and displayed on the Mobi KWIK screen.
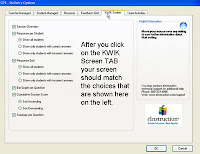
You want to make sure that the KWIK Tab settings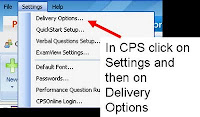 are correct inside the CPS software. In the CPS software click on Settings on the tool bar and then Delivery Options. Click on the KWIK Tab and make sure that all of the selection boxes are checked.
 After you have all the settings correct you engage a question session normally then on the Mobi tablet select the Clicker Softkey (third from the Left) and you will now see the data in the KWIK screen.
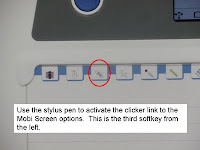
Einstruction offers a 2 inch KWIK view screen on their Mobi that allows you to seamlessly integrate your CPS data. As students answer questions on the response clickers the data is transmitted and displayed on the Mobi KWIK screen.
You want to make sure that the KWIK Tab settings
 are correct inside the CPS software. In the CPS software click on Settings on the tool bar and then Delivery Options. Click on the KWIK Tab and make sure that all of the selection boxes are checked.After you have all the settings correct you engage a question session normally then on the Mobi tablet select the Clicker Softkey (third from the Left) and you will now see the data in the KWIK screen.
Images provided by Einstruction
Tuesday, September 15, 2009
Did U Know: Document Cameras
So far we have discussed some differences between Document Cameras (doc cams) and overhead, that they can take pictures like a digital camera and that they can record video like a camcorder. So what else is there to do with a document camera you may ask?


Both the AverVision and Queue software offer a(n) annotation feature that allows you to draw over your projected information, be it print, image or object. So lets take a look at what each software has to offer.

The Queue software from Lumens offers access to its Annotation tools from the link in the toolbar on the right side of the window.


You have 11 options available to you: The Pointer tool, Laser Pointer Tool, Pencil Tool, Text Tool, Draw Line, Draw Ellipse, Draw Rectangle, Eraser Tool, Clear All, Color Choice blocks and Line/Text size adjustment. You want to make sure however that you go back and select the Pointer Tool before you close the Annotation Tools because it keeps the last selected option in memory. So if you have selected the Pencil Tool and you close the Tool box you will still be drawing with the pencil when you click on the screen.
The AverVision software from AverMedia offers direct access to the Annotation tools from the main toolbar. The entire bottom half of the toolbar are your annotation tools.
There are seven options on the toolbar and some that will offer an additional pop-out menu of other available options. Freehand Drawing, Insert Line, Insert Rectangle, Insert Ellipse, Insert Text, Select & Paste and Eraser. If you choose the option of freehand drawing you will have an additional menu of choices like, thickness, color and style.
Both software applications offer you many different ways to identify, create, write, spotlight and make your projected images stand out so that they are out of the ordinary and unique.
Images provided by: AverMedia & Lumens
Tuesday, September 8, 2009
Facebook instead of 911?
Now I am all up for new and innovative ways to communicate but ####!!!
I read this article from techradar.com from this past weekend where two children were trapped in a storm drain in South Australia and rather than call "000", their version of 911 they updated their Facebook status to tell people what was going on.
The children, ages 10 and 12, were probably out being kids when they got in trouble. I am also probably sure that somewhere along the way their parents, relatives, school teachers, etc.. told them that if they were in trouble to call "000" to talk emergency services, not update their status on Facebook. IF this does not raise an eyebrow with you, parents and everyone else out there someone is living under a rock.
Now I believe in technology and work with it everyday to try to help people to better integrate it into their lives but this may have gone to far. It took more time to update Facebook than it would have for the children to call emergency services. We live in an ever changing society that offers our children technological advances that we as adults over the age of 30 never had growing up. But we still have to instill in our children, and I bet their parents did that afternoon, there are certain things you do when you are in an emergency situation... and it is not to update your Facebook status.
Some of you may be angry at the statements but as the MFS (Metropolitan Fire Service )spokesperson said "If they were able to access Facebook from their mobile phones, they could have called 000, so the point being they could have called us directly and we could have got there quicker than relying on someone being online and replying to them and eventually having to call us via 000 anyway."
Monday, August 31, 2009
Did U Know: Document Cameras
Last time, on Did U Know, we discussed how the document camera (doc cam) was able to take still pictures while in either the camera or computer mode.
Let's go one step further and talk about how we can record video with the doc cam, yes...I said record videos. You may not have known that your doc cam could even do this, well it can. Now there are some restrictions to doing this depending on the model doc cam you have so I will explain how each one works.
Lumens doc cam series
We have a number of different ones in the system: DC 152, 155 and 166 (Red Models)

All these models allow you to activate the video recording feature from the software computer mode. You simply select the Record button from the tool bar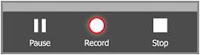 and then while in a small floating tool bar appears in the center of the viewing area that you click and a display box opens where you name the file and select the location to save it to. Once you do this you are now
 recording all actions through the doc cam. After you have recorded your video click the Cancel Record button in the toolbar.
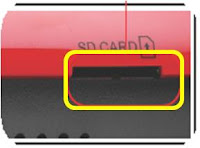
Now in the DC 166 model doc cam you also have an availability to record directly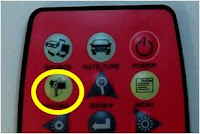 to the doc cam with the remote control record button. There is one catch, you have to use an SD memory card (similar to what you would have in a digital camera) to record from the digital camera.
AverMedia doc cam series
We have a number of AverMedia doc cams as well that have the same feature to record video through the software, in this case AverVision 3, and here are the steps to follow. While in the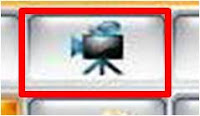 software select the movie camera icon from the tool bar, when you do this you will have a dialogue box appear where you will name the file and select the location to save. In the viewing area of the window you will see a flashing REC and time stamp to let you know that the recording is happening. When you are done click the movie camera icon again and it will ask if you want to stop the recording and you will choose the option.
So take a look at your doc cam as more than just a projection device, look at it as another medium for media and content delivery to your students.
Let's go one step further and talk about how we can record video with the doc cam, yes...I said record videos. You may not have known that your doc cam could even do this, well it can. Now there are some restrictions to doing this depending on the model doc cam you have so I will explain how each one works.
Lumens doc cam series
We have a number of different ones in the system: DC 152, 155 and 166 (Red Models)

All these models allow you to activate the video recording feature from the software computer mode. You simply select the Record button from the tool bar
 and then while in a small floating tool bar appears in the center of the viewing area that you click and a display box opens where you name the file and select the location to save it to. Once you do this you are now
 recording all actions through the doc cam. After you have recorded your video click the Cancel Record button in the toolbar.
Now in the DC 166 model doc cam you also have an availability to record directly
 to the doc cam with the remote control record button. There is one catch, you have to use an SD memory card (similar to what you would have in a digital camera) to record from the digital camera.
AverMedia doc cam series
We have a number of AverMedia doc cams as well that have the same feature to record video through the software, in this case AverVision 3, and here are the steps to follow. While in the
 software select the movie camera icon from the tool bar, when you do this you will have a dialogue box appear where you will name the file and select the location to save. In the viewing area of the window you will see a flashing REC and time stamp to let you know that the recording is happening. When you are done click the movie camera icon again and it will ask if you want to stop the recording and you will choose the option.
So take a look at your doc cam as more than just a projection device, look at it as another medium for media and content delivery to your students.
images provided by: AverMedia & Lumens
Monday, August 10, 2009
Did U Know: Document Cameras
Session One: Document Camera use in the Classroom
Taking a picture with your document camera
Not only is your document camera great for displaying items that are placed underneath the lens you can also take a photo image of what ever you are working with.
What we have in our district are Lumens and Avermedia Document Cameras. Here are the steps involved to capture images with each of the devices.
Avermedia Document Camera:
 1. Through the Document Camera you can click the Capture button on either the base of the unit or on the remote control.
2. Through the computer software by clicking on the camera button on the toolbar.
Lumens Document Camera:
 1. Through the Document Camera you can click the Capture button on either the base of the unit or the remote control.
2. Through the computer software by clicking on the camera button on the toolbar.
Once you have captured the image you can view it by selecting the Play button on either remotes or when in the software on the computer just open up the image using the system default viewer. In each model of document camera there is an internal hard drive that allows you to store and average of 80+ images, while using the software you can capture as many images that can be stored onto your computers hard drive.
Tune in for Session 2 on recording video.
Taking a picture with your document camera
Not only is your document camera great for displaying items that are placed underneath the lens you can also take a photo image of what ever you are working with.
What we have in our district are Lumens and Avermedia Document Cameras. Here are the steps involved to capture images with each of the devices.
Avermedia Document Camera:
1. Through the Document Camera you can click the Capture button on either the base of the unit or on the remote control.2. Through the computer software by clicking on the camera button on the toolbar.
Lumens Document Camera:
1. Through the Document Camera you can click the Capture button on either the base of the unit or the remote control.2. Through the computer software by clicking on the camera button on the toolbar.
Once you have captured the image you can view it by selecting the Play button on either remotes or when in the software on the computer just open up the image using the system default viewer. In each model of document camera there is an internal hard drive that allows you to store and average of 80+ images, while using the software you can capture as many images that can be stored onto your computers hard drive.
Tune in for Session 2 on recording video.
images provided by: MyLumens.com, Avermedia.com
Subscribe to:
Posts (Atom)