Friday, July 29, 2011

What's in a Picture

In our office today one of my colleagues, @web20classroom, decided that we were going to try something new with our Smartboard. He decided that we were going to live stream video from the beach to give us a new perspective on how to use the board. This has now become our window to the world.

So I began to think a little bit of some ways that images can be used with your Interactive White Board (IWB). It was a great idea to put the live shots of the beach on the board because everyone that has come into our office today has commented on what they were seeing. The comments have ranged from "I wish I were there right now," to physical displays of a diving motion towards the board. What a great idea that immediately sparked conversation, laughter and a lot of smiles. The site that was used to display the live feed was was Earth Cam.

I started to think of other ways that I could use images with an IWB to engage students in the classroom. Ways to incorporate the and merge the technology into the classroom. I thought about using the Reveal/Shade tool to cover up the image(s) at the beginning of class and then have a student come up to the board and raise the shade to show the picture for the day.

What ways can you use the images then, you might be asking? Why not try some of these suggestions.
  • As part of your Virtual Field Trip
  • Showing images of locations for Social Studies
  • Identifying different weather types
  • Famous people
  • Object identification
  • Geometric shapes
  • Atomic Structures
  • Article Identification for ESL and Foreign Language
  • Identification of Architecture
Images can be preloaded into the software that comes with your IWB so that you can either click through or reveal the images to the students and discuss them. Displaying the images or live video could also support your Essential Question for the subject you are working on. You could create a game using the images to find a location in the world. Kind of a where in the world is... situation. Being able to reach the students and bring in a visual component to the lessons adds so much more to their learning experience over and above the norm.

You may now be saying how will this affect me in my instructional day? As a teacher using you IWB and displaying images could factor into the new evaluation tool for Standard IV for integrating and utilizing technology in instruction. It can also encompass the new Common Core standards for using technology tools and skills to reinforce classroom concepts and activities. As well as using technology and other resources for the purpose of assessing, organizing, and sharing of information.

Friday, July 22, 2011

Redefining Virtual Field Trips

I watched an online seminar yesterday on Virtual Field Trips that made me rethink an earlier post that was written on our blog may need a refresher.

So what is a Virtual Field Trip? In my reading I came up with this definition as to how I see it from my standpoint. It is a series of webpages that have been organized and grouped together to show students information, places, things that they may not have been able to experience on their own. Ok, we have a quasi definition of a Virtual Field Trip what is next, how do we get started, what is the first step to create one for my students.

Obviously there are some technology items that you will need to start with. A computer/laptop and an Internet connection. You could also have a digital projector and an Interactive White Board (IWB) but they are not necessary.

What do you do to get started now that you want to create a Virtual Field Trip. You have to figure out and decide what you are looking for first. Once you have that down you are ready to get all your ducks in a row.

  • Make sure that you have everything all planned out. You have to do the research prior to the lesson and have all other resources ready to go.
  • Make sure that you have reviewed all necessary video materials for questionable content
  • Go through the trip first without your students so you know that the web links are still active.
  • Have students work together to create their own field trips similar to the one they have just been on.
  • Have a purpose and focus the students on that goal during the field trip
One additional thing that you can do to make the Virtual Field Trip more personal to the students is if you have an IWB in your classroom. Students can come up and interact with the screen and direct the flow of the field trip themselves. This can be a really nice for some of the lower grades since the student could almost feel like they are in the field trip walking around and exploring.

Again you may be saying how will this affect me in my instructional day? As a teacher creating a Virtual Field Trip could factor into the new evaluation tool for Standard IV for integrating and utilizing technology in instruction. It can also encompass the new Common Core standards for using technology tools and skills to reinforce classroom concepts and activities. As well as using technology and other resources for the purpose of assessing, organizing, and sharing of information

Give it a try and see what you think, you never know your students may just like the new you are integrating technology into their daily lessons.

Friday, July 15, 2011

Recording your Lessons in ActivInspire

I have to admit that I had been overlooking a tool in ActivInspire for a long time until just recently and now it is something that I use almost daily. That tool is the Screen Recorder.


What the tool allows for is two different modes of capturing what you are doing on the
computer at a time. You can choose the Fullscreen or Area screen Recorder. Fullscreen is obvious but the Area screen recorder allows you to pick a location on the screen by dragging a box around the area you want to record. Once you select the area or tell Inspire that you want to record it puts a small control box on the screen.


To start recording just click the Red Circle on the controller. A pop up box will ask you were you want to save and what you want to name the video. The file format is .avi which is easily editable on either a PC or Mac. Then all you have to do is use the Inspire software like you normally would in class and the system records all of the actions. Now the system will also record whether or not you are in Inspire or not so if you need to go out to a website it will still record what you are doing. If you have a microphone attached to your computer it will record you speaking as well.

Well now you might be saying to yourself, so what? How can I use this in my classroom with students. One of the easiest things I have found to do with the recorder is to make short "How To" videos within the Inspire software. So how do you access the Screen Recorder Tool in ActivInspire? It is very easy and there are a number of ways to get there. The easiest is to select from the Menu bar at the top of the page View then More Tools and Screen Recorder. From your floating toolbox click on the Menu Button then Tools, More Tools and Screen Recorder. The Screen Recorder can also be accessed from the Desktop Tools "floating gadget"


You can have your students come up to the ActivBoard to complete lessons, work out math problems, identify/label objects, chart maps and graphs, and a myriad of other things that allow your lessons to be both interactive and have a multimedia component to them. Again you may be saying how will this affect me in my instructional day? Creating the multimedia products and the interaction with the interactive white boards can fulfill the new evaluation tool for Standard IV for integrating and utilizing technology in instruction. It could also cover part of the new Common Core standards for using technology tools and skills to reinforce classroom concepts and activities. As well as using technology and other resources for the purpose of assessing, organizing, and sharing of information.


images created from: ActivInspire software

Friday, July 8, 2011

Kickin' it QR Style with your Document Camera

I have been talking about all of the things you can do with your Document Camera (doc cam) lately and have something new to show you and talk about that I had not even considered until a few days ago.

I have talked about a doc cam being able to be used as a digital camera, camcorder, webcam but I did not think to mention that it can also be a scanner. You might be saying, Evan how in the world can a doc cam be a scanner? Now I am not meaning that it is a true scanner like you would buy at an electronics store. What I am referring to is a Bar Code or primarily a QR code reader. Yes your doc cam can be a QR code reader. If you follow these following steps you will be able to use your doc cam to scan in those ever increasingly popular QR codes that seem to be popping up all over the place.

Before I go into the rest of this post I have to tell you that I have done some limited research and have found one PC based program that I like more than others for its simplicity of use and ease of integration with different doc cam types. You may have found others that you like just as much or more than the one I will discuss. I ask that you please share those resources with me so that there can be more choices available.

The first thing that I would have to say is you need to have a working doc cam hooked up and installed properly to your computer.

The program that I found the easiest to work with is QRreader from the Spark Project website. The program itself is relatively simple to install and setup but there is a catch, it requires you to install Adobe Air first so that it will install correctly. If you do not install Adobe Air first the QRreader installation file will not show up correctly and your computer will not recognize the file type. So lets get the Adobe Air file installed onto your computer. Just follow the link and click download now, its takes just seconds to install the software. Now lets install QRreader onto your computer. Save the file first, install it and follow all the defaults during the process.

Open the QRreader program from the All Program menu on your PC and you will have a small window that opens up on the screen. Remember that your doc cam must already be attached via USB and turned on. If it is, you will be seeing the area directly under the doc cam. Place a QR code under the doc cam and you will see a screen pop up with the text link to the site the QR code is directing you to. Just click on the text link and a web browser will open up to the site.

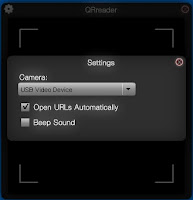
If you want the link to open up as soon as you scan the code you will have to turn on that feature. To do this it is very simple. In the top left of the viewer there is a sprocket hover over it and click on it to open the settings window. There are only three options to choose from. The Camera, Open URL's automatically and Beep Sound options. Yep just three things to set if you want to. Here is where you can check off that you want links to open up automatically when the QR codes are scanned. Now I have to give you a disclaimer, because it happened to me, if you have the open URL automatically turned on you need to make sure that you remove the code after it scans. If you do not remove the QR code it will continue open up the same link over and over again in a web browser until you remove it.

So that's it, that's all, nothing else. Now you will be able to use your doc cam to scan QR codes. Again I have to say that this is just one of many different types of software that is available for computers. If you have your favorites please share them in the comments section and I will post them to my Live Binder. If you want to know more about QR codes and using them in Education you can follow the link below to the Live Binder create by a colleague of mine.