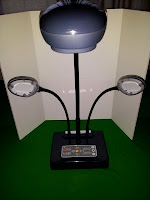
The 522 is the latest model to come out of the Promethean ActiView line up. This unit boasts a longer goose neck than the 322 series to allow for more mobility when adjusting the Lens head to objects that you are displaying. This doc cam adds an additional light for greater visibility in low light situations. The 522 also has and upgraded square base to allow for greater stability. One significant modification in the design of the 522 doc cam is that the positional alignment has been changed. An object being displayed must be parallel to the base in order for it to show as right-side up in the projection. The base also has an upgraded hard drive for storage of up to 128 images at 1024x768 resolution. The Lens has also been upgraded to the V2 high definition series for better clarity and improved zoom and display capability.
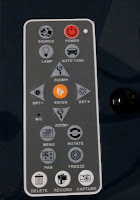
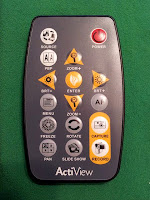 You have a Remote Control as well as on the base you have a fully integrated keypad that allows you to control the document camera while using it as either a stand alone device or while it is hooked up to a PC or Mac system. Along the top row of the keypad are the Power and Source buttons. The Source allows you to switch back and forth between the computer and projector when the unit is set up as a pass-through device. On the second row are the Lamp and Auto Tune buttons. Pressing the Lamp button turns off both lights at once and this only an on/off feature. The Auto Tune(Car) button will adjust Brightness, Zoom and Auto Focus all at once. The Middle of set of buttons are the Zoom In/Out, Brightness -/+ and the Enter Key. You will also notice that some of these buttons have arrows underneath them. When you see these types of buttons you will have to press another button in order to activate this feature. In the same area of the panel is the built-in microphone. The next row of buttons are the Menu and Rotate options. The Menu button only works when you are in the Document Camera Mode displaying through the digital projector. The Rotate button will adjust the image in 90 degree increments from 0 - 360. The second to last row has the Pan and Freeze button. Freeze does what it says and locks the image in the display so that you can either change the information under the doc cam with out seeing the activity in the display area. The Pan button allows you to put larger than 11x14 item under the lens which allows you to then use the Arrow keys to Pan across the object in small increments without moving the Lens neck. On the bottom row are the Capture, Record and Delete buttons. Capture allows you to take a picture of the displayed image same as a digital camera. The Record button allows you to use the built in microphone to create a video of what you are doing under the doc cam lens. The Delete button removes the stores images and video from the internal hard drive housed within the base of the doc cam. The remote control has most of the same action buttons as the base, albeit in a different configuration, but there are a few items removed and some new buttons added. There is the PBP button which allows you to display both a static image stored in the base along with the live image right next to it. The AF button which allows you to Auto-focus, and the Slide Show button which allows you to display the content stored on the doc cam hard drive and use the arrow keys to move between the items similar to that of a digital presenter.
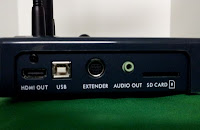
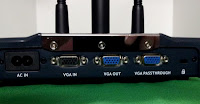
On the back of the base you have the Power in and VGA inputs and outputs. You have the option here to set up the device as a pass-through with a digital projector and computer where the doc cam acts as a switch box between the two. Which allows for the use of the Source button on both the doc cam base and remote control. On the top side of the base are some additional plugin options. One is an HDMI connector that will allow you to plug the doc cam into any HDMI device. You have the USB connector that allows you to hook up to a computer so that the doc cam can just be a usb device only that will utilize the proprietary software packaged with it on the PC or Mac. You have an 8-pin connector and an Audio Out to attach to an external set of speakers so that when you play the recorded video you can hear the sound as well. And lastly you have the SD Card slot that allows you to expand on the internal storage within the doc cam base. You can also setup through the Menu options for images and video to be stored directly on the removable SD card instead of the internal drive.
Now that you have the particulars of the physical hardware in my next installment I will go into the included software and some uses in the classroom. Look for part II coming soon.
2 comments:
How long of a video can one record and does it support time lapse?
When recording a video it depends on how large the SD Card is. It will basically record until the disk is full.
Time lapse is an option on the unit as well. It can be done as a stand alone or through the software.
Post a Comment