Now that we are just a few days away from the end of yet another school year, the fear sets in, and a question comes to mind. Are my students/children going to forget what they have learned during the school year this summer? We all know that somewhere down the line we all seem to click off the learning button when it comes to the summer. The beautiful days, full of sunshine, trips to the pool, beaches and other areas to visit.
Fear not, try out these links to give your students/kids some fun time on the computer. Oh and it is educational too.
1. Have your students learn about the US Mint with History In your Pocket website.
2. Play all types of interactive learning games with Funschool from Kaboose.
3. Learn lots of fun and interesting facts about everything at Fact Monster.
4. Get more information that you want to know about in Math at Math Playground.
5. Learn about the Geography from the National Geographic Kids site.
6. Did you ever want to learn how to play a musical instrument, try out Play Music.
7. Learn about America's Story from the Library of Congress.
8. Get a grip on Art with the Art Junction.
9. Learn about the Science Experiment of the Week.
10. Learn how to create computer programs with Scratch from MIT Media Labs.
These websites range in difficulty to offer challenges to all grade levels from Kindergarten to High School. So after your students/kids have visited their favorite vacation spots or have been outside running around all day getting physical exercise. Give them the opportunity to exercise their minds too with a couple of these websites.
Tuesday, June 8, 2010

Thursday, June 3, 2010
Need Some Feedback? Use MYstuDIYo
MYstuDIYo is a quick way to create a quiz that you can embed into your blog, wiki or website. Now I know that the website says to create a quiz but you can think outside of the box, maybe to apply this as a feedback generator, a user poll, temperature check, etc. Remember what I always say, "Your imagination is your only limitation."
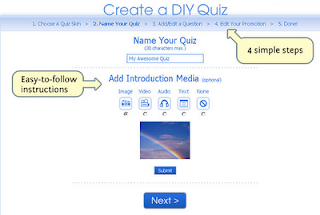
MYstuDIYo can offer up multiple different options for you to get data. It takes only a couple of minutes to get started and 4 short steps that get you to the final goal. It is just as the website says, you can "Create a Do-It-Yourself Quiz."
There is always a downside to these sites, yes you have to create yet another annoying username and password to log in to create your quiz. But it literally takes seconds, they just need an email, username and password. Oh and of course you have to check that box which says you agree to their terms of use.
You have two styles of quizzes to choose from. The standard multiple choice and a general feelings type of question. ex: "How do you feel about something" or "How well do you know this."
I am actually creating a quick quiz while I am writing this blog entry so that you know how fast it is to go from start to finish.
Step 1 is to select a Design (which is optional) - you could also use the advanced options and add you company or school logo.
Step 2 is to Name your Quiz, Select a Category and add an introduction (this can be a media file)
Step 3 is to Start adding your questions. You have choices here as well as to use media, some advanced features and to of course preview the question.
Step 4 is to choose whether or not you want to have the scores show on the top of the screen or to have a user created ending to the quiz.
Step 5 is where you can go see your active quiz, share it with people through email or to grab the code and embed it onto your website, blog or wiki.
It took me less than 5 minutes to go from start to finish, now it may take you longer depending on how many questions you put in. The big thing here is to know that you have this as an avenue to generate data. And speaking of generating data, you also have access to all the submitted data which can be viewed in real time as users answer the questions.
MYstuDIYo can offer up multiple different options for you to get data. It takes only a couple of minutes to get started and 4 short steps that get you to the final goal. It is just as the website says, you can "Create a Do-It-Yourself Quiz."

There is always a downside to these sites, yes you have to create yet another annoying username and password to log in to create your quiz. But it literally takes seconds, they just need an email, username and password. Oh and of course you have to check that box which says you agree to their terms of use.
You have two styles of quizzes to choose from. The standard multiple choice and a general feelings type of question. ex: "How do you feel about something" or "How well do you know this."
I am actually creating a quick quiz while I am writing this blog entry so that you know how fast it is to go from start to finish.
Step 1 is to select a Design (which is optional) - you could also use the advanced options and add you company or school logo.
Step 2 is to Name your Quiz, Select a Category and add an introduction (this can be a media file)
Step 3 is to Start adding your questions. You have choices here as well as to use media, some advanced features and to of course preview the question.
Step 4 is to choose whether or not you want to have the scores show on the top of the screen or to have a user created ending to the quiz.
Step 5 is where you can go see your active quiz, share it with people through email or to grab the code and embed it onto your website, blog or wiki.
It took me less than 5 minutes to go from start to finish, now it may take you longer depending on how many questions you put in. The big thing here is to know that you have this as an avenue to generate data. And speaking of generating data, you also have access to all the submitted data which can be viewed in real time as users answer the questions.
Image provided by: MystuDIYo
Monday, May 24, 2010
Using Exam View with Classroom Performance System(CPS)
Did you know that you can use your Exam View question banks with your Classroom Performance System(CPS)? You may currently be using your Exam View question banks but have been hand keying in your questions to the CPS for your students to do their reviews.
There is an easier way to import your Exam View question sets directly to CPS so you do not have to hand key in the questions or use Verbal questions. How you may ask?
First you will have to have the Exam View CD in the computer or the content loaded to a location on the system where you have access to it. After you have opened your CPS software make sure that you are on the Prepare Tab --> Lesson & Assessments section.
Now Make sure that your database is showing on the left hand column of the screen and select it by left clicking on it one time. Once you have done that click New button and Select Lesson and create a new Lesson with the name of the Exam View question set or something that is closely related to it so that you do not have to search for it. After you have created your new lesson then it will show up under your database in the left hand column.
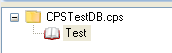 Right click on the new Lesson and choose Add File(s).. from the list to open the search dialog box where you will now search for the location of the test banks you want to upload. Before you can see the questions on the right hand side of the screen you will see a small dialog box pop up that asks you the Location Details of the question set. You have to answer this two times by selecting North Carolina form the drop down list. Once this is done you will see the test bank questions show up on the right side of the screen. **The questions cannot be modified from their original format.**
Now that the questions have been uploaded you now click on the Engage Tab --> Lesson & Assessments and choose the appropriate question set you want to deliver and engage it for the students to begin responding. **Remember for a Student Paced test you must select Assessment Setup and choose Student Paced before you click on the Engage button.**
There is an easier way to import your Exam View question sets directly to CPS so you do not have to hand key in the questions or use Verbal questions. How you may ask?
First you will have to have the Exam View CD in the computer or the content loaded to a location on the system where you have access to it. After you have opened your CPS software make sure that you are on the Prepare Tab --> Lesson & Assessments section.

Now Make sure that your database is showing on the left hand column of the screen and select it
 by left clicking on it one time. Once you have done that click New button and Select Lesson and create a new Lesson with the name of the Exam View question set or something that is closely related to it so that you do not have to search for it. After you have created your new lesson then it will show up under your database in the left hand column.
 Right click on the new Lesson and choose Add File(s).. from the list to open the search dialog box where you will now search for the location of the test banks you want to upload. Before you can see the questions on the right hand side of the screen you will see a small dialog box pop up that asks you the Location Details of the question set. You have to answer this two times by selecting North Carolina form the drop down list. Once this is done you will see the test bank questions show up on the right side of the screen. **The questions cannot be modified from their original format.**
Now that the questions have been uploaded you now click on the Engage Tab --> Lesson & Assessments and choose the appropriate question set you want to deliver and engage it for the students to begin responding. **Remember for a Student Paced test you must select Assessment Setup and choose Student Paced before you click on the Engage button.**
Images provided by:
eInstruction CPS version 6.51
eInstruction CPS version 6.51
Tuesday, May 18, 2010
Fun Interactive Art Sites for Students
I came across theses sites while I was looking for some resources that can be used with either a SMARTBoard or ActivBoard in the classroom. All of these are fun, creative, interactive sites for students to express themselves through art.
Destination Modern Art: This is a website that helps children ages 5 to 8 to learn about Art by participating in an interactive journey through New York's Museum of Modern Art (MoMA).
Students will learn about the art works of MoMA by investigating the works of art, learning about artists, their techniques, and their inspirations. Students have the ability to participate in the online activities at school or at home.
NGA Kids: National Gallery of Art. A complete interactive site that allows students to create and learn about Art. Students are able to create their own artwork in the Faces & Places, Art Zone, Brushter, Photo Op, NGAkids Jungle, Collage Machine and Flow. The site also offers a Calendar of Events of exhibits, as well as interactive lessons for students from the NGAClassroom link.
Curious Corner: Art Institute of Chicago. A website designed for children and students ages 3 to 12 to help them to learn and understand the world of Art. Students will be able to investigate artworks from around the world and then be able to connect them to their own experiences through interactive activities.
Learn About Color: A website created by The Metropolitan Museum of Art to help children learn their colors. Students are asked to color in William the Elephant with the primary colors. In the site students are asked to mix the colors together to make as many new colors as they can.
These are just a handful of sites to help your students to learn the painters and sculptors of the worlds most famous artworks and to bolster their knowledge of what Art has done through out history. These websites can easily be used with your Interactive Whiteboards or stand alone computers in your classroom or computer labs with your students.
Destination Modern Art: This is a website that helps children ages 5 to 8 to learn about Art by participating in an interactive journey through New York's Museum of Modern Art (MoMA).
Students will learn about the art works of MoMA by investigating the works of art, learning about artists, their techniques, and their inspirations. Students have the ability to participate in the online activities at school or at home.
NGA Kids: National Gallery of Art. A complete interactive site that allows students to create and learn about Art. Students are able to create their own artwork in the Faces & Places, Art Zone, Brushter, Photo Op, NGAkids Jungle, Collage Machine and Flow. The site also offers a Calendar of Events of exhibits, as well as interactive lessons for students from the NGAClassroom link.
Curious Corner: Art Institute of Chicago. A website designed for children and students ages 3 to 12 to help them to learn and understand the world of Art. Students will be able to investigate artworks from around the world and then be able to connect them to their own experiences through interactive activities.
Learn About Color: A website created by The Metropolitan Museum of Art to help children learn their colors. Students are asked to color in William the Elephant with the primary colors. In the site students are asked to mix the colors together to make as many new colors as they can.
These are just a handful of sites to help your students to learn the painters and sculptors of the worlds most famous artworks and to bolster their knowledge of what Art has done through out history. These websites can easily be used with your Interactive Whiteboards or stand alone computers in your classroom or computer labs with your students.
Wednesday, May 5, 2010
Document Cameras and the Smart Table
If you have a SMARTBoard you are able to have that Document Camera Image show up in the Notebook software so that you can annotate over top of the image on the screen.
Well you can do something similar to that with your younger students using the SMART Table.
With a document camera you will place the items below the lens, whether it is coins or money, shapes or any object that your students will need to identify. Once you have your items placed take a picture of them.
Once you have the image in a format that is compatible with your SMART Table, files with these extensions are common - .jpg, .png, .gif, you can upload it to the table into one of the activity options. One of the most common ones to use with images would be the Hot Spaces.
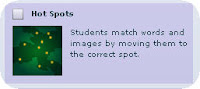
Once in Hot Spaces you will enter in a name in step 1 to create your activity. Step 2 will provide you the opportunity to insert an image directly on the screen or as a background. You will choose the background option. Browse to the saved image from your document camera and upload it to your Hot Spaces activity.

After you have set the background to the image, you can create your hot space locations and add the item labels that your students will move around to identify the objects, etc. from the background image.
Well you can do something similar to that with your younger students using the SMART Table.
With a document camera you will place the items below the lens, whether it is coins or money, shapes or any object that your students will need to identify. Once you have your items placed take a picture of them.
Once you have the image in a format that is compatible with your SMART Table, files with these extensions are common - .jpg, .png, .gif, you can upload it to the table into one of the activity options. One of the most common ones to use with images would be the Hot Spaces.

Once in Hot Spaces you will enter in a name in step 1 to create your activity. Step 2 will provide you the opportunity to insert an image directly on the screen or as a background. You will choose the background option. Browse to the saved image from your document camera and upload it to your Hot Spaces activity.

After you have set the background to the image, you can create your hot space locations and add the item labels that your students will move around to identify the objects, etc. from the background image.
Images provided by: Smart Table Toolkit Software
Monday, April 19, 2010
SMART Table: Collaborate & Learn through Touch
 We have just recently installed, into our Elementary Schools, our fourth SMART Table. Now some of you may be asking... "What is a SMART Table?" The SMART Table is a multi user, multi touch interactive device that allows young students the ability to learn in a collaborative environment using visual, auditory and tactile senses.
 As I was setting up the table the teachers were stopping by with their students to show them what I was doing. You had to be there to fully understand the expressions on their faces as I would show them how they could just touch the table top and it would make the objects move or a video would play. This is my second install of a SMART Table in our district and I have to say that I am excited about the possibilities for the students using the them.
The table allows up to 40 simultaneous touches and up to 8 children using it at one time. Now you may think that with all of those little hands the SMART Table would really get dirty and may not function well. The nice thing is that you can quickly clean the surface with any Non-alcoholic-based cleaner.

Not only are the students learning subject material but they are indirectly learning social, thinking and motor skills as well. The table comes with a number of preloaded content and activities to get your students participating right out of the box. You can also add new content and activities to the table via a usb connection and transferring directly into the table's computer. There are a number of resources available online at the SMART Technologies website. As well if you are not sure and still need some additional instruction there are a number of videos and printed materials to get you started on the road to discovery and learning. Check this out for more insight on how to see the big picture as the SMART Solution integrates into your classroom instruction. If you still have questions check out the table FAQ from the Smarttech website.
SMART Table image provided by: SMARTTech.com
Tuesday, March 16, 2010
NCTIES 2010: SMARTBoard 10.6
During this years 2010 NCTIES conference I had the opportunity to sit in on the SMART 10.6 update session. There are lots of new updates for this version as well as a couple of things that will need a little bit of discussion.
So what is the deal with the new software. From what I saw in the workshop the new version 10.6 is a combination of the SMART Math and standard SMART 10.5 software. Now we all know that the SMART Math software has a cost to it, even though there is a dual load capability per license it is still pretty costly in this time of economic turmoil. The new SMART v 10.6 will give you a lot of features of Math version without the cost. The new version offers you an "appetizer" in that it allows you full access to SMART Math tools for ONLY 30 days. The nice thing is that after that 30 days not all of the tools go away, you get to keep a few things that are actually some very nice tools to use.

After you load the software you will notice that there is an additional tool bar which shows up below the standard tool bar but can be hidden if needed.
Measurement Tools: The Icon with the Compass and Protractor
You have access to a new Protractor, Compass, Ruler. These tools are different from the original ones from the Gallery. They are more intuitive and practical.
Ruler - Trace along the edge, toggle between metric and empirical, numbers stay justified regardless of position and it shows the angle degrees.
Protractor - Similar to original except that you have a Green bar that can be adjusted to show the angle, trace along the edge, you can eject the angle onto the Notebook page and numbers stay justified when rotating.
Compass - Similar in design to original except new one offers easier adjustments of angle than original, ink matches pen colors and can create both arcs and circles.
There is an addition to the Lines Tool in that you can now create perfect curved lines. On the Shapes Tool you now have additional perfect shapes in a circle and square as well as all triangular shapes.
There are also some great resource options that are available.
SMART Exchange Integration - now there is a direct link to the website from the Gallery Tab
Training Materials - directly from the SMART Tech website.
Online Training - provided in sessions through out the year to help you out.
Training Video - Let's you know what is new in Version 10.
Learning Management System - Where you can sign up for and participate in online training.
Google Search - SMART inspired that filters automatically down to 25 resources.
Educator Google Search - Created by an Educator to filter down to 125 lesson resources.
So what is the deal with the new software. From what I saw in the workshop the new version 10.6 is a combination of the SMART Math and standard SMART 10.5 software. Now we all know that the SMART Math software has a cost to it, even though there is a dual load capability per license it is still pretty costly in this time of economic turmoil. The new SMART v 10.6 will give you a lot of features of Math version without the cost. The new version offers you an "appetizer" in that it allows you full access to SMART Math tools for ONLY 30 days. The nice thing is that after that 30 days not all of the tools go away, you get to keep a few things that are actually some very nice tools to use.

After you load the software you will notice that there is an additional tool bar which shows up below the standard tool bar but can be hidden if needed.
Measurement Tools: The Icon with the Compass and Protractor
You have access to a new Protractor, Compass, Ruler. These tools are different from the original ones from the Gallery. They are more intuitive and practical.
Ruler - Trace along the edge, toggle between metric and empirical, numbers stay justified regardless of position and it shows the angle degrees.
Protractor - Similar to original except that you have a Green bar that can be adjusted to show the angle, trace along the edge, you can eject the angle onto the Notebook page and numbers stay justified when rotating.
Compass - Similar in design to original except new one offers easier adjustments of angle than original, ink matches pen colors and can create both arcs and circles.
There is an addition to the Lines Tool in that you can now create perfect curved lines. On the Shapes Tool you now have additional perfect shapes in a circle and square as well as all triangular shapes.
There are also some great resource options that are available.
SMART Exchange Integration - now there is a direct link to the website from the Gallery Tab
Training Materials - directly from the SMART Tech website.
Online Training - provided in sessions through out the year to help you out.
Training Video - Let's you know what is new in Version 10.
Learning Management System - Where you can sign up for and participate in online training.
Google Search - SMART inspired that filters automatically down to 25 resources.
Educator Google Search - Created by an Educator to filter down to 125 lesson resources.
Subscribe to:
Posts (Atom)