Friday, December 16, 2011

Embedding HTML into ActivInspire

Recently Promethean's ActivInspire program has had a fairly significant update to the software to provide a lot more versatility to its users.  The latest version of the software is 1.6.46087 and if you aren't sure what one you have you can click on Help in the Main Toolbar and then Click About to see which you are running.  If you are not running the latest version you are missing out on a lot of new improvements to the software.  So how do you update the software you might be asking?  Well it is really simple.  First you just go right back to the same Help button and then click Check for updates.  A window will pop up and say that there is a new update available and will ask you to Run, Save or Cancel.  The best thing to do is to Save it to your computer and then Run it after it downloads.

Now that is out of the way let me talk about one of the, at least I think so, Best New features of the latest update.  It's the ability to Embed HTML code directly into a flipchart page.  What a great concept to be able to embed content directly into the flipchart page so that you do not have to open up web browsers or office documents or even additional pdfs.  So how do you do this?  It's really easy as long as you have the update.  Click on Insert then Link and then Embed HTML.


After you do this you will see an panel box open and all you have to do is paste in the embed code and click OK.


So... you might be thinking, what would be the benefit of having this feature.  Well think of working on Fractions in Math with your 5th graders and need to show them a short video explaining the process that is on Schooltube or Teachertube.  Normally you would have to minimize ActivInspire and then open up your favorite browser and go to the video to see it.  All the while your students are getting restless due to the down time.  If in your prep work you go to the site and grab the embed code and Insert it into the flipchart page there is no down time because when you go to the page the video is there and all you have to do is click the Play button. 

Now the embedding is not just limited to video sources you can also embed documents and pdf's directly into your flipchart as well.  You can use an outside webstie called Embedit.in to store the files and then just copy and paste the embed code into the flipchart.  Then you will have a nice clean viewer for the document on the page and have the ability to both download and print from the presentation if needed. 

What else can you do, why not embed a map into your flipchart.  Yes I know there are maps already in the Resource Browser of ActivInspire but sometimes the map is not as detailed as you want it to be.  So just open up Google Maps and click on the Chain Link button to see the embed code to copy and paste into your flipchart.

Do you create Animoto videos or use Voicethread with your students in class?  You can take the student created work and embed it into your flipchart pages as well with the embed codes that are generated directly on the respective sites.

Wow there are so many choices of how you can use the Embed HTML feature in the new ActivInspire it can almost seem overwhelming.  My philosophy is to just start slow and do something easy like just adding a Google Map to your flipchart page.  Watch this following video to see how easy it really is.


Now that you see how easy it is I hope that you have fun embedding everything directly into your flipchart pages so that you can keep your students on task and focused with no downtime in the classroom.  If you are having any difficulties or need some additional assistance or maybe even some ideas there's a lot of resources and feedback in the Community Forum Section of Promethean Planet website where you can ask and gets answers to your questions.

Lumens DC 190 Part II

In looking at the software for the new Lumens DC 190 document camera (doc cam), you do not see any changes to the 3 by 3 or 4 by 4 grid.  The software itself has been updated to v.1.0.9 for Ladibug and there have been a few updates and improvements to it for use with your computer.  Again the software is available on both PC and Mac, however I did not see on the website the availability for Linux for this new version as of yet.  All of the buttons here work just like they have in the past with one new item.  If you click the Lightbulb Icon you are able to toggle back and forth between the regular lamp and the LED light on the head unit.  If both lamps are off the sequence is as follows as you click the icon; lamp, lamp and LED, LED, off.  Again the addition of the LED lamp is a nice feature because it gives you just enough light and is not as overpowering at the lamp. 


Before I go in any further I have to add in that one of the best new features that I have seen is that if you press the Menu button on the Remote Control you are able to see it in the viewing area after you have clicked the Display live images button.  And it is fully functional so there is no need to have the doc cam hooked up as a pass-through device were you are forced to toggle the source back and forth so you can make Menu changes for the doc cam hardware.

Nothing has changed in the button options when you click the Advance button.  The Capture still images, Record video and Time Lapse capture have not changed.  The Camera Settings button has changed slightly in the way that it looks for users.

I mentioned it in my first post but there are a new feature button changes, one is the PIP button which allows you to see the static images that are stored in the doc cam base along with the live image in the bottom left hand corner of the view screen.  Now a bonus is that you can use the arrow keys on the remote to move the live image around on the screen if it is needed.  Press one time to get in and select the static image and to get out you have to press it again and then the Menu button to get back to the full screen live image.  Another new button is Pan which is just a name change from the old Book button.  Nice thing is that it is a one click in and a one click out.  The Capture and Record buttons here will store the media in the built in hard drive in the base of the doc cam and not on the computer like the buttons do on the 4 by 4 grid. 

Now for what I think is the best new upgrade is that the Arrow and Menu buttons on the right side of the panel are now fully functional.  This is a big leap over previous versions where they seemed to be just ornamental and were waiting for technology and coding to catch up with them so they would work properly.

Now to go along with all of the good I have to give you my opinions on what I think are some of the bad things I have seen with the new DC 190 and software.
  • The Rotate button is no longer on the remote control, a staple that has been there for a while.  Now you have to go into the software Advanced tools or use the hardware Menu key on the remote.
  • You can no longer see the Doc Cam internal storage as a drive on the computer when the unit is turned off.  You will have to change the default menu options to save to a USB drive then take that to the computer to read the information that has been saved to the DC 190 base.
  • The built in microphone will only record to the doc cam.  It cannot be used as a USB microphone through the computer.  May just need to have a USB Audio driver upgrade.
  • The Microscope attachment has gone from a threaded design to a post attachment design.  To me this is a real design flaw that needs to be addressed.  Within the first month of installation many of our teachers have already broken the adapter because they have twisted it to far and the posts break off which are no more than a millimeter or two thick. 
  • No clear instruction for switching the light sources on the Doc Cam. 
Now I am not trying to be negative, I have spent a long time working with Document Cameras over the past three plus years and have figured out many ways to get around and make things work.  I welcome any input from people out there if you are using the new DC 190, share your comments below.

Monday, December 12, 2011

Google Earth Timeline

During a Planning meeting last week with one of my schools we were looking over some of the layers available on Google Earth and the information that you can get from them and we noticed something that was new to us.  It may not be new to anyone else but we thought it was very interesting. 


What we noticed was that there was a date in the bottom left side of the window when we were viewing our location in Google Earth.  When we clicked on the date (1993) in the upper left side of the viewing area appeared the Historical Time Slider.  It was very interesting to be able to go to a location on the map and then go back in time to see what the area looked like years before.  We were able to look at the school location that we were at and see what the area looked like before the school was even built.  There were even some photos showing the process of the school being built which the teachers thought was very neat and felt there students would enjoy it as well.

It was very interesting to show it to the students when they came back into the classroom.  They were wide eyed and happy to see that they could walk up to the ActivBoard in the classroom and move the earth to the area they wanted to see and then zoom into it or type in the location they wanted to visit and have the program pull back and then zoom back in to their destination.  They were able to then use the time line to go back in time to see what the area looked like in the past.  Now so far the limit for the time line is back to 1993 but in some cases that is enough to see what an area looked like 10 years earlier or before the students were born.

Again I might be behind the time in seeing this feature but we were all having a great deal of fun using it with the students in the classroom.

images taken using ActivInspire Camera Tool of Google Earth Time Line Tool

Thursday, November 10, 2011

My First Look at the Lumens DC190


Finally I have recently gotten to really sit down and take a look at the new (well almost new) Lumens DC 190 document camera(doc cam) that has recently replaced the DC 166 that hit is EOL cycle.We have been using the DC 166 model for a couple of years in our school district and will now be transitioning over to the newer design model.

At first glance you do not see anything different in the look and design of the doc cam, it is their termed "Ladibug" design series.  Upon further inspection there are two noticeable items that are different in this design over earlier versions.  One is that there is a USB plug-in  instead of the SanDisk port of the earlier 166 model.  The other difference is that there is a microphone built in the front of the base now so that you can include sound with your video recordings in the camera only(presenter) mode.

Another big change in the DC 190 over its predecessors is the redesign of the remote control.  Now you still have the standard buttons on the base of the doc cam; Capture, Playback, Zoom +/-, Power and Menu.  However there is a new look to the remote.  They have gone back to the basic black color design, which is great for those who are color blind (like me) because it makes the buttons and names stand out.  There are a couple of changes on the remote control that need to be mentioned so that you know where to look now versus earlier models.  The Source button is now located below the Power button, a big departure from having it in the top left which is now the Freeze button.  The Menu button flips over to the opposite side of its current row.  The Book button has now been replaced by Pan, which is a more appropriate name to describe the action that is associated with the buttons actions.  It still works the same way, you press it once to get into the Pan mode and then again to exit.  A huge step ahead of it previous version is what use to be the PBP button which is now PIP.  Yes it should sound familiar because it is Picture in Picture.  You have the live image in the background and then the static image in the bottom corner that you can choose from by using the selector (arrow) buttons to view the available images.  There is a new edition to the remote and that is the Mask button which similar to how you placed a piece of paper over your old overheads.  About 3/4 of the screen is darkened out on the first click, the second then puts a veil over the whole page except for a square in the middle of the screen.  You can then use the arrow keys to move the square around on the screen similar to a spotlight feature or move to reveal.

Another nice feature of the DC 190 is that there is now an LED light that is under the Head unit.  Now depending on the ambient room light you only had the option to either have the light source on or off.  Now you can select the LED light so that you still have an additional light source that is not as bright as the normal lamp light that has been on the Ladibug design for years.  The LED light source is just below the lens unit when you raise the head up at straight.  You can toggle between the modes using the Lamp option button in the Ladibug software.

Stay tuned for part 2 of my look at the Lumens DC 190 where I will go into the Software changes and then give you a break down of the good and bad that I have seen in the new design.


Tuesday, November 8, 2011

A New Take on History

If you are a fourth grade teacher and have not been to the North Carolina History Project web page you might just be missing out on some new and interesting facts about North Carolina.  You might be asking how can this site benefit me?  Here is how they describe it. "... an edited, evolving, and free online encyclopedia of North Carolina that also includes commentaries, lesson plans, and a community calendar."

To me the site offers a lot about North Carolina that has been broken down into multiple categories and listing so that it makes it easier on the researcher to locate topics for discussion, reports, conversations an other information.

The site homepage is laid out well to offer the visitor a quick glance at what is available but to also provide the most amount of searching power in a few short clicks.  On the website you have scrolling image set of people, places and things inherent to North Carolina that you can click on and read more information about.  Across the top of the page you have an alphabetical list so you can perform a broad topic search just like an Encyclopedia by just clicking on the letter you want.  There is a Featured entry of the day section in the bottom middle of the page that offers you a one click link to read more information about the topic.  You can also browse through the Category dropdown menu on the right side of the page to filter information about specific topics.  Categories like Colonial North Carolina, Places, Document, etc.  Then in the bottom right corner of the page lists out the latest information that has been added to the site.  So far in just a few days of researching the site I have been able to find lots of information quickly and easily through the different search options available on the site

The North Carolina History Project site is funded by the John Locke Foundation and they are currently offering a Citizens' Constitutional Workshop from the link on the left banner.  This link takes you off of the site to the John Locke Foundation website for further information.

There is a separate Educators Corner on the site that offers some research and lesson plan information that has been shared with the site through user created content.  Currently there are not many user lesson plans available but there is a call to share on the site where if you create lesson plans from the content on the site you can share it with them and they will review and post the information for others to use.

If you are teaching North Carolina History whether in Elementary or Middle School this is a site that you just might want to add to your resource list not only for your use but for your students as well.

Friday, October 28, 2011

Fun with Learning

This week while I was researching some resources for one of my schools I came across a neat little game to help young students learn the Alphabet without having to sing it.

Promethean Planet has an interactive resource to aid students in learning the Alphabet.  It is an interactive puzzle where the students are able to come up to the board and interact by moving the puzzle pieces around so that they fit into their desired location.  When the puzzle piece is in its correct location it will lock in place and is no longer able to move.  If the student does not place the puzzle piece in the correct location the piece can still be moved around on the board.  Each puzzle tile has a Capital and Lower case for each letter of the alphabet along with an image to help reinforce their learning.


As I was touring a school this week I saw a teacher in a Kindergarten classroom that was having her students looking at an alphabet handout that was being displayed using the document camera.  I went into the classroom and talked with the kids to see how they like the new equipment all of them were really excited and were telling me how much they liked getting to go up to the board and touch it.  I asked them if they would like to play a new game to help them learn their alphabet letters.  They all were nodding their heads in agreement.  I loaded up this swf file onto a flipchart and all of the kids were clapping and cheering and all of them had their hands raised to come up to the board first.  It was great to see all of their faces light up as they were working on the board.  I even had them stop for a moment to turn on the Dual User feature so that two students could be at the board at the same time.  You think I had brought in their favorite candy and let them run wild.  They were all engaged and telling each other where the pieces were to go.

If you are a teacher give this a try by clicking the image above and downloading the file to your computer.  Then you will need to open up ActivInspire and click Insert then Media and choose the alphabet.swf file to place it into your flipchart page.  One hint to help you out would be to make sure after you insert the file and re-size it appropriately then save the flipchart so that when you reset the page after the lesson it will move all of the puzzle pieces back out around the edges.

Image provided by Promethean Planet


Friday, October 21, 2011

Re-Opening my Eyes to Instruction

This week I had a great opportunity to be in Alpharetta and Atlanta Georgia.  While in Atlanta I was fortunate enough to be able to go to the Ron Clark Academy and sit in on a class.  This was the first time that I have ever been there and in my normal fashion was late getting to the school.  As we came into the classroom I found a seat on the far side of the room and had walk through the room to sit.  I quickly moved across the room as quietly as I could, while doing so I noticed that non of the students were disrupted by my tardiness and that Ron Clark kept their attention the whole time.

The room was alive with action, Ron Clark was talking, students were responding and interacting to his queues all without giving a second thought to the number of people that were staring at them around the room.  As I looked around the room I thought to myself, wow how can these kids be able to keep focused with almost double their number in adults sitting there watching.  Then Ron turned the tables on us, the adults, he had the students grab an adult to help them work out different math problems he had posted around the room.  So our student led us over to the one of the questions and he was working it out so fast that when it came time to answer it on our ActivExpression we did not even have the unit on and working.  Then we did another activity with the students and we were all engaged in the classroom activity.  Me I was awestruck at how well behaved and comfortable the students were with us in the room.  Almost like it was old hat to them.  I came to find out a short time later that these students had only been in the school for just around 30 days.

At the end of the lesson Ron Clark gave the adults in the room the opportunity to ask questions of the students.  I was amazed again at the students responses.  There were very well spoken and thanked us for asking the questions.  One question that I had my co-worker asked a young girl in the room was how she and the class felt about having all of the adults coming through on a regular basis.  She responded with that is was almost second nature to them and they were happy to have us in the room because were excited to see the students learn and they thrived on the energy.  I heard the question come up about whether or not they were treated differently now that they were at the Academy by their peers.  The answer came out that things had not really changed all that much.

In talking with someone a little bit later who said that these students had come from so many differing situations and felt so proud of what these children had accomplished in just a short amount of time was remarkable.  Me I could not believe it.  Which led me to share on another co-workers blog post It started with a simple question..   what I learned this week and that is, "regardless of a child's situation if they have a goal and are focused on that goal they can overcome and accomplish anything."

Now I am not the type of person that gets overcome by certain things but as we were leaving all of the students in the classroom were shaking our hands and thanking us for coming in and sharing their day with them, but one little girl came up and said I don't shake hands I give hugs and thanked me for being there and sharing in her day.  I could not believe it and was overcome with some emotion that this young child whom had never seen me before was comfortable with hugging a perfect stranger and thanking me for being a part of her class.

Of course we, the adults, all came out into the hallway to go down the slide at the Ron Clark Academy where all of the students from the classroom were at the bottom waiting for us singing and cheering us on as we got to the bottom of the slide.  As we emerged form the slide the children shook our hands and gave us a sticker that said we were "Slide Certified"


This experience has given me a new perspective on my own personal and professional life.  A kind of re-opening of my eyes to certain things and breathing some new life back into this routine which we all get in from time to time.

Monday, October 17, 2011

ActivEngage: A BYOD Solution?

I recently had the opportunity to take a look at the new ActivEngage from Promethean Planet and have to say that I am very impressed.

You may be asking yourself what is ActivEngage, in my own words it is an interactive way to deliver and receive content to and from students over multiple types of devices.  The full description from Promethean is: "...a virtual learner response system that enables students to contribute in the classroom by responding to questions from their laptops, tablets or mobile handheld devices..."  So what does it do?   ActivEngage allows the teacher to deliver Learner Response questions to students without the need of either an ActiVote or EctivExpression, yes, I said without the need.

How does it work?  ActivEngage is a software package from Promethean Planet that you download to your computer, ie a teacher workstation.  Once installed you will have an additional option in your voting Browser that will allow you to deliver questions through a Virtual Hub to any wireless device in range.  With the install there is a Server install which is what is setup on the Teachers computer along with a Client install which will then need to be installed onto any laptops, or other computer workstation in the classroom.  Along with this any student that had their own handheld device, ie. iOS or Android product they can install the ActivEngage App from the respective store onto their own device and interact with the Teacher workstation.

The question then comes to So What?  So what  do you do with it now that you have it.  It looks like it could be an answer to the question of how do we deliver assessments to students.  There are a lot of discussions starting now and some implementation of school systems going totally paperless.  That is everything provided to and handled by students would be delivered electronically.  Testing being one of the discussion topics.  This could be a great opportunity by school systems to take advantage of what is already available to them that they normally will take away if seen in a classroom.

That is why I say lets take a look at the BYOD option, not implement it outright, just take a look at it.  Yes it is going to be a very large undertaking for many school districts across the country and world.  You are looking at fundamentally changing the infrastructure of your local in house LAN/WAN.  There are lots of precautions that have to be taken into account first.  Many regulations put in place to protect the students, teachers and schools.  But now is the time to start the conversation if you have not done so yet.  Normally we have students put away their devices in the classroom or even in some cases we take them away.  Let's take a look at possibly embracing the technology and using it to both advantages.

I know that there are many other products out there that can offer up similar results based on student devices and teacher delivered content.  I hope that some will share their options as well.  ActivEngage was something that I saw that really looked like it could solve a growing problem positively.

Friday, October 14, 2011

Exploring New Territory

While working in a school this week with different grade levels a Tech Facilitator told me about one of their Kindergarten teachers who was going to make their first Skype call with another school. Now I was thinking that they were going to make a Skype call here locally within the school district or maybe at the most here in North Carolina. I was surprised, and a bit excited, to hear that they would be talking with a classroom in Hawaii. When I talked with the teacher involved she said that they were going to be talking with the school and then she had also setup a Twitter account so that her students could tweet out their feelings about the call. I could tell that the teacher was a little nervous about making the first call, but that is normal since you really do not know what to expect the first time.

Their first call was this week and everything went really well when we talked about it and the students had already began to post their tweets on Twitter. The only thing that the teacher remarked about was that she was going to look into getting a different microphone so that the participating class would be able to hear the students better during the call.

This Kindergarten teacher has taken a big step and seems to have gone outside of her comfort zone. I have to commend her for taking things to the next level and exploring new territory. I hope that this quick blog will help to inspire you as well to explore new territory and to step outside of your comfort zone.

Tuesday, September 20, 2011

ActivInspire Export Options

In talking with someone recently about being able to export a flipchart to a pdf on a PC I decided to write up a quick blog about it and include that you can also export individual pages as image files as well.

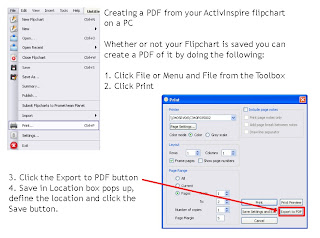
To export a flipchart as a pdf file you will, of course, need to make sure that the file is open inside of ActivInspire first. Once that is done you will need to just click on the File button in the top left of the window or click the Menu button and then File from the Toolbox. Now comes the strange part you will need to click the Print button or you could also press the CTRL + P kwik key option. Yes I did say the Print option, because you will be printing the page to a pdf. After you click print then select the Export to PDF button. Now you have the Save in Location box that pops up and all that is left to do is to name the file and click Save.


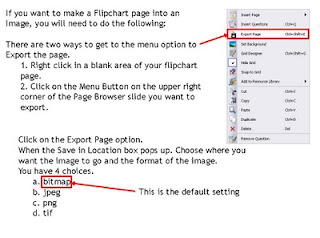
You can also export a flipchart page as an image file. In order to do this you have two options to start. First is to just Right click on the flipchart page you wish to convert or from the Page Browser click on the Menu icon in the upper right corner of the page to convert. Click the Export Page button and the Save in Location box pops up. Name the file and then choose from one of the four file types listed, the default file type is bitmap. Then click the Save.


I hope that this provides you with some new insight into some of the additional features that you may not have noticed within the ActivInspire software.

Friday, September 16, 2011

Wonderopolis Categorizes its Wonders


For a number of months I along with some of my colleagues have been talking, tweeting and blogging about the fun and interesting ways educators can use Wonderopolis in their classrooms. Some teachers are using the "Wonders" as their start up activity or as a ticket out the door.
One way I had not thought about using the wonders was to have it tied to the subject material that teachers are delivering in class.

I went back into take a look at some of the past wonders. Which can be done by clicking on the Wonders Tab at the top of the website. I started to make lists of the wonders that could be used in class as part of the curriculum. As I was making the list I had a Duh moment. Over on the right hand side of the Previous Wonders page there is a column labelled as Categories.

This was that light bulb moment because when I started looking through the names I noticed things like Art, Cooking, Environment, History etc., and as soon as I clicked the site provided me with a list of wonders along those categories. With nearly 350 current Wonders on the site and hopefully many more to come these Category listings will eventually grow larger and larger. This will be able to provide educators more choices in delivery of content to students. Plus, who knows, it may motivate a student to take a greater interest in Science, Math, History, English/Language Arts or Weather.

So take a look at Wonderopolis to see what wonders are waiting for you and your students.


Image Provided by: Wonderopolis.org

Making a Difference

In the first week of school this year I received an email from a teacher who was a little frazzled because her classroom Interactive White Board (IWB) was not displaying the computer input correctly.  I had a free moment before leaving to go to a workshop so I called over to the school to speak with the teacher.
When I got the teacher on the phone they proceeded to describe to me what the problem was and I immediately realized what was going on and that it was a simple fix.  Now there was a problem that came up, I would not be able to get to their school until the next day so I decided to walk the teacher through the fix over the phone while she was in her classroom.
I had the teacher go through the steps slowly with me by describing the steps they would need to do to fix the problem with the IWB.  The teacher listened to me and was able to do the steps to fix the problem and even talked the steps back to me and said that they would be able to fix the teachers IWB in the room next door because they had the same problem.
She was very excited to have things working and her students, that were in the classroom and behaving incredibly well, were excited as well.  She had the students thank me over the phone which made me feel very good.  Now what was even better was the fact that two days later an inter-office envelope came into me with the following card that the students in her class made for me to thank me for taking the time to call their teacher to help her with the problem.


To me I was just doing my job but to the students I made a difference by taking the time to contact the teacher and help her out over the phone.  I had a friend some number of years ago tell me to figure out how you can make a difference and take it as far as it will go.
So now I have to ask you.. How have you made a difference today?

Thursday, August 11, 2011

ActivInspire and Jigsaw Puzzles

I have been running down my feed lists and social media outlets today and came across a neat little tool that I had to share out.

When I saw the blurb about it I followed the link and found out that it came out of the Community and Blog Section of Promethean Planet's International site. It was a blog post from last year by Nigel Pearce on a neat little program called Jigflip that allows you to create a jigsaw puzzle from any standard image. I have used it with jpegs, png, gif and bitmap files so far and the program works fine to create them as jigsaw puzzles. So you may be asking how this little program works, well here is the quick down and dirty.

The first thing that you do is to download and run the program and a window will appear where you have three steps to follow. Step one is to drag the image you want to break apart into the box. Step two is to select to either have a 12 or 48 piece puzzle created from the image. Step three is your options like shading, background color etc. That's it, all you have to do now is to click the Make button to create the puzzle.


Oh and I almost forgot the most important feature of the JigFlip program after you click the Make button it automatically creates an ActivInspire Flipchart page of your new jigsaw puzzle.

Download it, give it a try and see if you like it. I think it could be a great fun starter activity for your Elementary students at the beginning of the day.

image taken using:
Promethean Camera tool

Friday, July 29, 2011

What's in a Picture

In our office today one of my colleagues, @web20classroom, decided that we were going to try something new with our Smartboard. He decided that we were going to live stream video from the beach to give us a new perspective on how to use the board. This has now become our window to the world.

So I began to think a little bit of some ways that images can be used with your Interactive White Board (IWB). It was a great idea to put the live shots of the beach on the board because everyone that has come into our office today has commented on what they were seeing. The comments have ranged from "I wish I were there right now," to physical displays of a diving motion towards the board. What a great idea that immediately sparked conversation, laughter and a lot of smiles. The site that was used to display the live feed was was Earth Cam.

I started to think of other ways that I could use images with an IWB to engage students in the classroom. Ways to incorporate the and merge the technology into the classroom. I thought about using the Reveal/Shade tool to cover up the image(s) at the beginning of class and then have a student come up to the board and raise the shade to show the picture for the day.

What ways can you use the images then, you might be asking? Why not try some of these suggestions.
  • As part of your Virtual Field Trip
  • Showing images of locations for Social Studies
  • Identifying different weather types
  • Famous people
  • Object identification
  • Geometric shapes
  • Atomic Structures
  • Article Identification for ESL and Foreign Language
  • Identification of Architecture
Images can be preloaded into the software that comes with your IWB so that you can either click through or reveal the images to the students and discuss them. Displaying the images or live video could also support your Essential Question for the subject you are working on. You could create a game using the images to find a location in the world. Kind of a where in the world is... situation. Being able to reach the students and bring in a visual component to the lessons adds so much more to their learning experience over and above the norm.

You may now be saying how will this affect me in my instructional day? As a teacher using you IWB and displaying images could factor into the new evaluation tool for Standard IV for integrating and utilizing technology in instruction. It can also encompass the new Common Core standards for using technology tools and skills to reinforce classroom concepts and activities. As well as using technology and other resources for the purpose of assessing, organizing, and sharing of information.

Friday, July 22, 2011

Redefining Virtual Field Trips

I watched an online seminar yesterday on Virtual Field Trips that made me rethink an earlier post that was written on our blog may need a refresher.

So what is a Virtual Field Trip? In my reading I came up with this definition as to how I see it from my standpoint. It is a series of webpages that have been organized and grouped together to show students information, places, things that they may not have been able to experience on their own. Ok, we have a quasi definition of a Virtual Field Trip what is next, how do we get started, what is the first step to create one for my students.

Obviously there are some technology items that you will need to start with. A computer/laptop and an Internet connection. You could also have a digital projector and an Interactive White Board (IWB) but they are not necessary.

What do you do to get started now that you want to create a Virtual Field Trip. You have to figure out and decide what you are looking for first. Once you have that down you are ready to get all your ducks in a row.

  • Make sure that you have everything all planned out. You have to do the research prior to the lesson and have all other resources ready to go.
  • Make sure that you have reviewed all necessary video materials for questionable content
  • Go through the trip first without your students so you know that the web links are still active.
  • Have students work together to create their own field trips similar to the one they have just been on.
  • Have a purpose and focus the students on that goal during the field trip
One additional thing that you can do to make the Virtual Field Trip more personal to the students is if you have an IWB in your classroom. Students can come up and interact with the screen and direct the flow of the field trip themselves. This can be a really nice for some of the lower grades since the student could almost feel like they are in the field trip walking around and exploring.

Again you may be saying how will this affect me in my instructional day? As a teacher creating a Virtual Field Trip could factor into the new evaluation tool for Standard IV for integrating and utilizing technology in instruction. It can also encompass the new Common Core standards for using technology tools and skills to reinforce classroom concepts and activities. As well as using technology and other resources for the purpose of assessing, organizing, and sharing of information

Give it a try and see what you think, you never know your students may just like the new you are integrating technology into their daily lessons.

Friday, July 15, 2011

Recording your Lessons in ActivInspire

I have to admit that I had been overlooking a tool in ActivInspire for a long time until just recently and now it is something that I use almost daily. That tool is the Screen Recorder.


What the tool allows for is two different modes of capturing what you are doing on the
computer at a time. You can choose the Fullscreen or Area screen Recorder. Fullscreen is obvious but the Area screen recorder allows you to pick a location on the screen by dragging a box around the area you want to record. Once you select the area or tell Inspire that you want to record it puts a small control box on the screen.


To start recording just click the Red Circle on the controller. A pop up box will ask you were you want to save and what you want to name the video. The file format is .avi which is easily editable on either a PC or Mac. Then all you have to do is use the Inspire software like you normally would in class and the system records all of the actions. Now the system will also record whether or not you are in Inspire or not so if you need to go out to a website it will still record what you are doing. If you have a microphone attached to your computer it will record you speaking as well.

Well now you might be saying to yourself, so what? How can I use this in my classroom with students. One of the easiest things I have found to do with the recorder is to make short "How To" videos within the Inspire software. So how do you access the Screen Recorder Tool in ActivInspire? It is very easy and there are a number of ways to get there. The easiest is to select from the Menu bar at the top of the page View then More Tools and Screen Recorder. From your floating toolbox click on the Menu Button then Tools, More Tools and Screen Recorder. The Screen Recorder can also be accessed from the Desktop Tools "floating gadget"


You can have your students come up to the ActivBoard to complete lessons, work out math problems, identify/label objects, chart maps and graphs, and a myriad of other things that allow your lessons to be both interactive and have a multimedia component to them. Again you may be saying how will this affect me in my instructional day? Creating the multimedia products and the interaction with the interactive white boards can fulfill the new evaluation tool for Standard IV for integrating and utilizing technology in instruction. It could also cover part of the new Common Core standards for using technology tools and skills to reinforce classroom concepts and activities. As well as using technology and other resources for the purpose of assessing, organizing, and sharing of information.


images created from: ActivInspire software

Friday, July 8, 2011

Kickin' it QR Style with your Document Camera

I have been talking about all of the things you can do with your Document Camera (doc cam) lately and have something new to show you and talk about that I had not even considered until a few days ago.

I have talked about a doc cam being able to be used as a digital camera, camcorder, webcam but I did not think to mention that it can also be a scanner. You might be saying, Evan how in the world can a doc cam be a scanner? Now I am not meaning that it is a true scanner like you would buy at an electronics store. What I am referring to is a Bar Code or primarily a QR code reader. Yes your doc cam can be a QR code reader. If you follow these following steps you will be able to use your doc cam to scan in those ever increasingly popular QR codes that seem to be popping up all over the place.

Before I go into the rest of this post I have to tell you that I have done some limited research and have found one PC based program that I like more than others for its simplicity of use and ease of integration with different doc cam types. You may have found others that you like just as much or more than the one I will discuss. I ask that you please share those resources with me so that there can be more choices available.

The first thing that I would have to say is you need to have a working doc cam hooked up and installed properly to your computer.

The program that I found the easiest to work with is QRreader from the Spark Project website. The program itself is relatively simple to install and setup but there is a catch, it requires you to install Adobe Air first so that it will install correctly. If you do not install Adobe Air first the QRreader installation file will not show up correctly and your computer will not recognize the file type. So lets get the Adobe Air file installed onto your computer. Just follow the link and click download now, its takes just seconds to install the software. Now lets install QRreader onto your computer. Save the file first, install it and follow all the defaults during the process.

Open the QRreader program from the All Program menu on your PC and you will have a small window that opens up on the screen. Remember that your doc cam must already be attached via USB and turned on. If it is, you will be seeing the area directly under the doc cam. Place a QR code under the doc cam and you will see a screen pop up with the text link to the site the QR code is directing you to. Just click on the text link and a web browser will open up to the site.

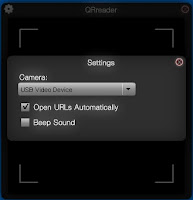
If you want the link to open up as soon as you scan the code you will have to turn on that feature. To do this it is very simple. In the top left of the viewer there is a sprocket hover over it and click on it to open the settings window. There are only three options to choose from. The Camera, Open URL's automatically and Beep Sound options. Yep just three things to set if you want to. Here is where you can check off that you want links to open up automatically when the QR codes are scanned. Now I have to give you a disclaimer, because it happened to me, if you have the open URL automatically turned on you need to make sure that you remove the code after it scans. If you do not remove the QR code it will continue open up the same link over and over again in a web browser until you remove it.

So that's it, that's all, nothing else. Now you will be able to use your doc cam to scan QR codes. Again I have to say that this is just one of many different types of software that is available for computers. If you have your favorites please share them in the comments section and I will post them to my Live Binder. If you want to know more about QR codes and using them in Education you can follow the link below to the Live Binder create by a colleague of mine.


Wednesday, June 29, 2011

Document Cameras in your Science Class

Now that I have been discussing uses of Document Cameras (doc cams) in your 21st Century classroom a co-worker suggested that I give out some specific advice for teachers to use them. So what I will be doing is to provide some general topic ideas for teachers to integrate the use of their doc cams into everyday instruction.

My first installment will cover some ways to use your doc cam in your Science class. In our school system we use Lumens DC 166 models with our classroom solution. You may have another version which is perfectly fine, many of the ideas that I will be discussing will transfer easily over to other models of doc cams.

What ways can you use your doc cam in your Science class you may be asking. Or you may just be saying let's get to the point, focus.

  • 3D imaging of Atomic Models
  • Plant Growth over time
  • Dissections
  • Terrariums
  • Show live images along with book photos
  • Display experiments for entire class to see
  • Show details of Bugs and other manipulatives
  • Display "Overhead" resources and use inherent software to write over the sheet without a vis-a-vis pen
  • Make recordings of experiments, dissections, classwork and homework
  • Connect to a Microscope to show cells and cell structures from slides


These are just a small snippet of the things that you can do with your doc cam in your Science classroom. I have a
Livebinder that offers up some additional resources to help get you started in your classroom with integrating your doc cam. One last thing that you may not have thought about that your doc cam can do. Did you know that the doc cam can act as a webcam with Skype? Yes, that is what I said, and you may then be saying so what. Well did you think about how this could open your students up to areas in Science that they may not ever get an opportunity to participate in.

How, you may be asking? You can contact Science Museums where you can take a virtual field trips. You can contact Science departments in Colleges and Universities so that your students who are interested in careers can find out what it takes to become a scientist. Watch my videos to see how to set up your doc cam with Skype and use it with Office products.

Again you may be saying how will this affect me in my instructional day? As a teacher using a doc cam could factor into the new evaluation tool for Standard IV for integrating and utilizing technology in instruction. It can also encompass the new Common Core standards for using technology tools and skills to reinforce classroom concepts and activities. As well as using technology and other resources for the purpose of assessing, organizing, and sharing of information.

Stay tuned for additional posts on ways to use your doc cam in your Math, English, Social Studies and Specialty areas.


Thursday, June 23, 2011

The Document Camera AHA! Moment

Recently I spent a day at a school working with teachers on ways to integrate Document Cameras(doc cams) into their instructional day more so that just as an expensive overhead. While you can still use your overhead resources, a doc cam offers teachers so much more. As I have talked about in other blog posts our school district has put a lot of time and effort into designing a 21st Century classroom solution. The solution include a doc cam for the teacher to use that is connected to the computer and can be use independently as well as with software on/through the computer.

As the workshop went on and our discussions started to focus in on the participants content areas I asked them what do they do in their classroom. Looking for specific types of responses I waited to see what would happen. A teacher spoke up and said they wanted to help their students go to college. I asked the teacher if the students knew what to expect in the process of applying to colleges. The teacher talked about what they did in the classroom from helping the students to fill out applications and getting documentation ready to send off to colleges.

I took over the conversation then and asked her how she helped them with the applications. Did you know that you can put the FAFSA form under the doc cam and focus in on a section of the application to help the students fill them out easier. The next question was, have you contacted an Admissions Dept. at a local University to talk with your students, because your doc cam can be used as a webcam? I immediately saw eyes lighting up and ears turning towards me. "I did not know that the doc cam could do that." "I had not thought about using the doc cam like that." As the conversation continued a teacher commented what could they do since they were a coach and taught PE. Immediately I asked them if there are some of his students that do not know how to dribble a basketball or soccer ball, or serve a volleyball. He said well yes there are. I responded with the fact he could use the doc cam to video tape another student performing the proper technique to dribble a soccer ball or serving a volleyball. A basic "How To" video made to help out the students. Another teacher spoke up and said I could video tape a student demonstrating proper bowing technique for Orchestra class. Another teacher said that, with a little prodding, how about video taping a mock business plan interview for critique and student review.

The light bulb lit up above each persons head and they all began talking about what they could do with the doc cam in their classroom. Even though they have had the doc cam in their classroom they just needed a little focus and encouragement, a spark to get them thinking of ways they can adapt their curriculum to incorporate the doc cam. At the end of the workshop many of the teachers came up to me and thanked me. Some said that they had never even thought about using their doc cam in the ways we talked about while other said they had never even turned theirs on yet.

There are doc cams in pretty much all of our schools in some form or another currently. If you are reading this post you may not have one but have seen one in the school before. Maybe this will spark something in you to go search out that doc cam in the building or to look at the one in your room differently. Maybe you need some more information about how to use them or some other ideas. I have created a Live Binder, linked below, on ways that you can use doc cams in your classroom as well as some general information from many of the companies that make them. Take a look for yourself and if you have questions you can ask your local on-site Technology Facilitator as well you have access to a District Instructional Technologist for your school that can help answer questions too. As well there are handouts and videos on how to use your doc cam in Learning Village our District Curriculum Warehouse. To find the information click on Resources under Curriculum and then Technology Resources.


Wednesday, June 22, 2011

Spark your Climate Curiosity

This morning I was reading through some Tweets and came across one that had a link to a website that I had not seen before.

The website is WeatherSpark which when I went to it really blew me away at the amount of information that was available on it. When you go to the homepage for the site you just enter in the city you live in or one that you want to see the weather for and click Get Weather.

Once you do this you are taken to the Dashboard Tab which is partitioned with a Geographical Map on the left side of the screen which displays the previous six hours worth of weather data. At the bottom of this side of the screen there is a slider bar with a play button that allows you to see the satellite imagery as the weather is coming in. You also can see the current temperature within the last ten minutes. On the right side of the screen is a graph that shows the weather trends in a chart format across the day, week, month and year. On the chart you can follow along with the temperature, precipitation and cloud cover during the day. As well you can follow along with that same information over time too. Yes you have access to historical data, looking at the historical information it seems to be generated according to the location that you are searching. So some locations may seem to have more than others as you are looking at them. You can also compare different locations to see how the weather is in different parts of the world on the current date or a time in history.

So how does this apply to you and how you could use this in your classroom? This could be a great opportunity to showcase your Promethean, SMARTBoard, or LCD monitor in your classroom with your students. As a center your students could come up to the board and check the local weather and their favorite vacation spot. You could go back to the year your students were born to see what the weather was like on the day that they were born. During the school year when you are concentrating on weather you can use this site to demo and to gather data. This could function as cross-curricular due to the statistical and analytical components that you could develop around the site.

For teachers this could also factor into the new evaluation tool for Standard IV for integrating and utilizing technology in instruction and helping students to develop problem-solving and critical-thinking skills. It can also encompass the new Common Core standards for using technology tools and skills to reinforce classroom concepts and activities. As well as using technology and other resources for the purpose of assessing, organizing, and sharing of information.

I have just scratched the surface as to the possibilities that you can develop around the WeatherSpark website. Take a look at the site, see what you think of it. After just a few minutes on the site I was hooked and started thinking about all the possibilities of uses that this site could have in the classroom. Thank you @willrich45 for sharing this resource.

Social Networking for Students with a Twist

I recently held a workshop for teachers in our district on a widely known but lightly used web resource within our district. The site is set up so that both students and teachers can have an arena for which to learn, collaborate and share information both in and outside of the confines of the four walls of your everyday classroom. There are two things that I really like about this site.
  1. Students DO NOT have to have email at all.
  2. It resembles another extremely popular website that students are familiar with that will hopefully make it more personal to them as they use it. (Facebook)
What site am I talking about? It's Edmodo. Here is a snippet of the description given by the Edmodo team.

"..Edmodo is a free, secure, social learning platform for teachers, students, schools and districts...it provides teachers and students with a secure and easy way to post classroom materials, share links, videos, documents, presentations, and much more. There are also special institutional features for schools and districts that can be accessed for free by administrators..." You might be asking, how does it work? Well it is really simple for the teacher to set up and for the students to access. Just a couple of clicks and you are ready to go with your students.

For the teacher: Go to http://edmodo.com
  • Click on I'm a Teacher and fill out the short form
  • Find Groups on the left side of the page and Click Create
  • The Group(Class) you create is for your students to Join later
  • When you Save the Group you will receive a Student Access Code
Now that you have created the Group(Class), all you have to do is start entering information for students in the Message Box in the top center of the page.

In the Message Box you can:
  • Enter Notes for students
  • Create Assignments
  • Ask questions by creating a Poll
  • Send Web Links, videos and files
  • Even send Alerts when necessary
Everything that both you and the students key in will show up in the Feed Roll in the center of the page, similar to the aforementioned website. Both the students and the teacher have the ability to send, receive and store documents within the Edmodo site. Which is a plus now that there is a push to "go digital" and leave the paper behind. But how do the students access Edmodo so that they can participate. It is very easy and remember no Email address required they just need the Code that was created when you set up the Group(Class).

As a Student: Go to the website
  • Click on I'm A Student
  • Enter the Code that the teacher provides you
  • Start following the Discussion in the center of the page
  • Join in the conversation
Edmodo offers the user many resources to Help get you started. From "How to" videos to resources dedicated to Help you figure out how to use Edmodo within the classroom. The Community page offers Groups that you can join to find additional resources by collaborating with others teachers and professionals that are using the site.

So why would you want to use Edmodo? What is the draw for me as a teacher to use this product over and above what I am currently doing in my classroom? Over the past few years it has been increasingly obvious that the Digital Age is here and we need to become a part of it. As teachers we need to look at different avenues to get our students attention. This website may just be that focal point. Students are already using Facebook, and Edmodo looks similar in design so that could be the buy in.

For teachers this could also factor into the new evaluation tool for Standard IV for integrating and utilizing technology in instruction and helping students to develop problem-solving and critical-thinking skills. It can also encompass the new Common Core standards for using technology tools and skills to reinforce classroom concepts and activities. As well as using technology and other resources for the purpose of assessing, organizing, and sharing of information.

Give it a try and see what you think, don't just take my word for it. You may discover that this tool will be a benefit to both you and your students. Take a look at the video below to get a little bit more information on Edmodo.


Image provided by Edmodo.com
video from Edmodo.com and ipadsammy

Tuesday, June 14, 2011

When Does Learning End?

Does learning end on the last day of the school year? It’s the end of the school year, you are ready to get out of the classroom and so are your students. But how do you keep their minds sharp during the summer months? What can you do to compete with the beach, family gatherings and all the other fun summer activities that they could be doing instead of learning?

I remember growing up that my mother, who wouldn’t admit to it, would plan our vacations and other summer time fun so that we would learn something at the same time. Whether it was a trip to the day camp at the local Museum, traveling to Washington DC and Philadelphia, going to the Aquarium while at the beach, or just something as simple as helping her plant a garden or baking cookies. She tried to keep us learning even though we did not know we were learning because we thought it was fun.

That was a long time ago, how long I won’t tell, but what do you do today? With all of the other distractions of this day and age how do you keep your Elementary School students or children learning throughout the summer?

There are camps that they can still go to, you can arrange trips to cities where they can learn about the history of the U.S. like D.C., Philadelphia maybe Beaufort, North Carolina’s first capital, or even local to Old Salem. But what happens when it rains or if it is to hot to play outside for any length of time? As much as I hate to say it there are all of those nice wonderful little gadgets around that they can play with. From the full blown gaming consoles and computers to iPad and Android tablets or even the small handheld devices like the PSP and Nintendo DS. There are educationally sound games that students can play that make them think through problems and use math concepts. I think it was interesting when a co-worker mentioned that their child started playing “Angry Birds” even though the child was having fun they were also learning, by default mind you, mathematical concepts for trajectory and angles. There are many different websites available for students to use that will allow them to continue their learning through the summer and they will think it is fun because it seems like a game to them.

Here is a sample list of sites that your students/children can go to on the web to learn during the summer or at any time during the year.

· PBS for Kids – Has educational games, videos and activities for kids

· BBC Children – Has educational games, videos and activities for kids

· Math Playground – Multiple resources for learning in Math

· NASA for Kids – Offers lots of fun interactive resources for student learning. Starchild site

· Tryscience – Where you can download fun experiments to do at home with your children

· Google Art Project – Virtual tours of Museums from around the world.

· Crayola for Kids – Online coloring and drawing activities for kids

Through our school system students have access to netTrekker an online safe search engine that will automatically filter out and remove any non-educational information so that you only see search results that have merit and have been checked out to make sure they are educationally sound.

As a teacher and as a parent, possibly, you know that learning is never done. It is always happening and ever evolving throughout your life. Take some time to teach or learn something this summer so that it will make a difference in a student/child’s life to help them be life-long learners.

Friday, June 10, 2011

Yes, You Can Do The Same Thing Twice

Have you ever heard the phrase... "you can't do the same thing twice, or ..I bet that will never happen twice?" Well I have to admit that I HAD that problem when it came to making duplicate shapes in ActivInspire. It would just seem to take forever to try to get the second shape the exact size as the first one that I drew. It was really bad when I was trying to create a Ven Diagram. Come on folks I know that there is someone out there that is shaking there head in agreement with me on this. So what do you do?

Well here are two quick ways that will allow you to create multiple shapes. Shapes that will always be the same size so that you do not have to sit there pulling your hair out because the mouse won't move in less than 5 pixels increments. At least that is what I think happened to my hair.

The first thing one is the hardest one to do you just click on the shape and in the object editing tools(the little boxes above or to the side of the shape) there is an icon with what looks like two pieces of paper, one on top of the other. This is the Duplicate button just click on that and there you go. Now I did say that one was more difficult didn't I? So the next way to accomplish this is to simply Left click(PC) or Click(Mac) and drag the shape to the top Right corner of the Main Toolbox and release. This will put an Icon of the shape just above the Edit User Defined Button Icon. All you have to do now is just click on the new shape icon that is in the Toolbox.

So give it a try and reduce your stress level when it comes to creating duplicate shapes in ActivInspire. Oh, I almost forgot. I did make a quick video that outlines what I just talked about so I hope that it helps you out.