Friday, October 26, 2012

Making the Elections Relavent

As this year's Elections draw closer and closer do your students really know what is going on?

With all of the ads on TV, radio and the internet it may be difficult for your students to see the big picture as you explain the election process to them.

Although this can be discussed in all grade levels it is more prevalent right now for students that are in the eighth grade. How might you ask?

Students in the eighth grade are currently learning about the Revolutionary War and the events that happened immediately afterwards. Those events helped to lead us to our first Presidential election. Again you may be asking why is this an important event in the lives of these students. The answer is simple, during the next elections cycle they will be High School Seniors and may have the opportunity to vote. So it is important for them to understand the process and how they can make a difference if they choose to vote, remembering to tell them that it is their choice.

Here are some resources that can help make the difference in how your students perceive the Elections and how they can get involved and make it relevant to their lives.

  • Have your students create Political Cartoons using this Arts Edge Lesson that brings in a cross curricular component to the normal Social Studies curriculum.  As well Arts Edge has a great Lesson on the Election Process to help enhance your instruction on how the process works.
  •  You can use Read Write Think as a launch point to provide a number of resources on the Election Cycle and ways to get your students involved.  Some of these resources discuss using Avatars to create political cartoon skits.
  • You can use this Themed Resource page from Smithsonian's History Explorer to give your students some more background on the election process.  See how Mass Media plays a role in the election process with this resource from Smithsonian. 
  • Try all of these resources that Thinkfinity has gathered together for you regarding the election process.
  • Here are a lot of Election Lesson plans and activities from EDSITEment that go along with the Social Studies curriculum.
So even though I am talking to all you eighth grade teachers out there, anyone can utilize these resources to help make the elections relevant to your students by having them become involved through some of these activities.

This will help drive home the importance of the subject material and even help them to understand the current events that are going on in the world around them.


photo credit: The Suss-Man (Mike) via photopin cc

Thursday, July 5, 2012

Starting the Day with a Wonder

Let me tell you a little about how I like to find fun things for students to do in class to start the day off right.  I think that the old saying is that Breakfast is the most important meal of the day and that students need it to start the day off in a good way.  Well I think that we also need to start their classroom day off right as well.  Something that feeds their minds when they get to school just as much as breakfast does before school.

About a year and a half ago, give or take a month, I was introduced to Wonderopolis by a co-worker as a site that offered up something different.  What they offered was short video clips that talked about some things that most people just wondered about.  I learned about the site in January of 2011 but the site had been up since October with its first wonder, Why are Flamingo Pink? That launched on Oct 4, 2010.  Wonderopolis is… “a program brought to life by the National Center for Family Literacy, engages and inspires families in the pursuit of education and learning together.” It also a product of Verizon Thinkfinity which… “offer comprehensive teaching and learning resources created by our content partners – the most respected organizations in each academic subject and literacy.

In January of 2011 I started talking to teachers about how to use Wonderopolis in the classroom and how it could benefit the students as the day begins.  I talked to the teachers and showed them the website and their eyes were wide open by all of the information.  Many times I would show the site to them and they immediately would start talking about how to connect what was on the site with what they were working on in class at the time.  As this was going on I would show them how they could search through all of the Wonders either with a keyword search or through the category options along the left side of the page.  The teachers were amazed at how much information was available to them as they looked at each of the wonders.  There is a description of the wonder, some additional questions, did you know section, some vocabulary words and even some fun project ideas to go along with the wonder of the day.  

I really enjoy the site and will continue to share it with as many teachers as I talk with.  The site offers so many additional resources associated with the wonders that even though they are meant to be short lesson starters, it is more often than not they can be turned into full blown lesson designed in conjunction with the curriculum.  

With all that being said, go to Wonderopolis and see for yourself.  I can be sure that there is something on the site which will add to your daily instruction.  Who knows you may even explore beyond the site to some of the other resources available from Verizon Thinkfinity and extend the learning even further.

Wednesday, May 16, 2012

Learning Through the Summer


Now that we are closing in on the end of the school year the big question is how to extend your students learning throughout the summer.  Do you give the students reading lists that you hope they will do?  Do you want them to sit in front of a computer all summer?  Do we have to follow the norm like ducklings behind their mother?  Now don't misunderstand me I am open for online learning, to an extent, but it needs to be done in moderation sometimes where activity can be inserted into the equation.  I know that growing up I did not have all the things to distract me as students do today.  My mother would send my brothers and I out in the morning with a hope and a prayer that we would not get into too much trouble.  Oh, and would come home sometime during the day to eat or at least be home for dinner.  That was my life, but today's students have so much more to occupy their time than just playing in the dirt or running around with the neighborhood kids or even just sitting around in the shade when it gets too hot out to keep running around.  I was fortunate enough that I had a parent at home and grandparents nearby to help keep an eye on us.  That may not be the case today, so what do you do to help your child(ren) continue to learn throughout the summer while making it fun and interesting.

What about some of these activities to help keep the learning going.

The Children's Museum of Winston-Salem Summer Camps
The Northwest NC YMCA Summer Camps
Mad Science Summer Camps
SciWorks Summer Camps
Summer Camp Programs at Creative Palooza
YMCA Camp Hanes Summer Programs

Don't forget about these places in or near Winston-Salem as well

Reynolda House Museum of Art
Reynolda Gardens
The Gardens at Old Salem
MESDA - The Museum of Early Southern Decorative Arts
The Children's Theatre of Winston-Salem
TangleWood Park and Gardens
The Asheboro Zoo
Historic Bethabara Park

Now these may not sound as interesting or glamorous as playing video games, Facebook, or shopping at the mall but who knows your child(ren) just might surprise you and thank you for taking them.  Learning should never end when you leave the classroom for the summer.  Maybe with a little bit of coaxing you can help your child(ren) to enjoy some non-digital means of learning that can help them to become life-long learners.


photo credit: pedrosimoes7 via photo pin cc

Thursday, May 3, 2012

Making the Most of Virtual Field Trips

Have you ever asked your students if they could go anywhere in the world where would that be?  Are you worried about the answers that you might get, don't?  With the budget issues we are always looking for alternative ways students can get an understanding of not only their immediate surroundings but what it is like around the world.  Yes we study World Cultures, US History, Ancient Civilizations etc., but most of the time that is being taught from print materials.  How can we as teachers make a difference in student learning so that it is more engaging and fun for them.  After you ask the students the places that they would like to go around the world and at home, take those choices and start creating Virtual Field Trips(VFT) of them.  If some of the choices closely relate to your current curriculum use them first and save the others for a quick filler activity. You have heard about VFT's for years so you may be wondering what else can be done to make them more engaging for students to get the most out of the activities.  You may already be using web quests so your students can gather information about the areas they want to visit.  So what else can you do?  Here are some quick little changes to what you are already doing that you can use with the students to get them more involved in the VFT.

The first thing that some people think of when it comes to VFT's is the use of Google Earth, an interactive software, that allows you to "..fly around the Earth to see cities, places, businesses, different terrains, images and 3D models."   Some may just use Google Maps to travel from place to place where you can switch between a Map and Satellite view.  You now also have an option to use a Google Earth plugin which mimics the stand alone program through the Google Maps website.  Others will use Web Browser searching for students to participate in VFT's.  Is this enough though to keep students engaged?   What else are you having your students doing while they are traveling?  So how do you takes things one step further.

Have your students create a video tour of their VFT and save it as a project they can add to their student portfolio.  If you are not familiar with these features in Google Earth along the top toolbar are a few things that will allow you to accomplish this.  You have the Placemark button which allow you to put a Pin at a location which then offers you the ability to add a description, images and web links.  Then after the students have placed a number of Pins in their location they can use the Add a Path button to create a path through their location.  Then they can use the Record a Tour button to create a video of the locations that they have visited.  If the Historical Images button is available they can even go back in time during their video tour to show an area through history as it has developed over time.

In Google Maps I recently discussed, in "A New Twist on Google Maps," how you can create your own custom maps and then share them with your students so they can collaborate, add information and update them at any time.  You as the teacher can also share links to the map and even embed it into a website, blog or wiki for your students to share and access.  So this would allow your students to keep a running log of all the VFT that they have gone on during a school year with all of their research stored in the map.

Another fun thing you can do in the planning process for your VFT is as you are gathering the location data you can put it into a spread sheet and then import that into a website called Batch-Geo.  This website as discussed in, Quick & Easy Mapping Made Easy, will take the spread sheet data and create an interactive map from it.  This can provide your students with a visual representation of all the locations they can choose from for their Virtual Field Trip.

Lastly, if you really want to get fancy with your VFT you can have your students create short videos about the location they are working on.  You can create green screen videos of your students flying over to the location and then stand and give a quick introduction about the place all the while in the background people see them flying and then pictures.  The students could even do mock interviews with people on the street, athletes and leaders from the area you are visiting.

Here is another blog article about Virtual Field Trips from @dbates479
This blog, Internet Explorers: Virtual Field Trips Are More Than Just Money Savers from Kara Platoni on edutopia shares even more.

Just a few things there that can help keep your students engaged.  Now as always I invite you to comment about other ways you are using Virtual Field Trips in your classroom below.

Friday, April 27, 2012

How do you Edit a Photo?


Now that Digital Cameras have image resolution capabilities up to and beyond 18 megapixels what do you do when you want to edit those pictures after you have taken them.  How do you take an image that is 4000x3000 and reduce it or compress it so that it can be put somewhere else like a webpage, blog, etc.  What tools are out there to do this? There are programs out there that can help you out but what if you cannot afford to buy a program what is your alternative.  Well up until recently there was a website that offered the ability to edit an image on the fly for Free, Picnik.  The site offered more than basic editing features for images that some pre installed computer software could handle.  But as you know websites come and go everyday and Picnik was caught in that wave of passing websites recently.  So what do you do now if you were an avid user of Picnik?  What are your options now, some sub par or expensive software that will either not give you what you want or go way over the top and give you so much more that you will never use all of the it in your lifetime.

Recently Mashable put together a small list of viable alternative websites that will allow you to edit your images on the fly on the web, Free and without the need for a registered account.  I took a look at them and these are some really robust and feature filled websites to allow you to edit pretty much any aspect of an image you want to.  The only issue that I founds that might come up is that Thumba requires you to have the most recent version of Microsoft Silverlight.  I think that you will have a lot of fun editing images on any of these sites.

Now if you are a teacher and are going to use any of these in the classroom with your students then make sure that you take a look at the sites ahead of time.  Some of them do have ads along the sides which could be of questionable material out of the grade level you are in which could cause some questions to come up from your students.   Some even have Apps that you can download to your Smart or iPhone.  Not that I want to promote any of these over another but PicMonkey does not have any ad space on its site that I could find as I was using the site.  But you make the decision on which one will be the best fit for your situation and comfort level.

photo credit: austinevan via photo pin cc

Thursday, April 26, 2012

My First Edcamp Experience


This past weekend I was able to attend my first Edcamp in Raleigh, North Carolina.  I was not sure what to expect and really did not know how things were going to work since I was told that there was no agenda.  No agenda I thought to myself, how will I know what I want to do and where I am supposed to be throughout the day.  If you do not know me, and my co-workers and friends can tell you, I am a very strict timeline follower.  I am used to doing thing according to a schedule and when that is disrupted I am not one that can appreciate the change rather quickly.

I was told that there was no solid agenda with no specific content to be covered or topics to be discussed.  It was up to the participants to choose what was going to be discussed.  Choose, I said, what do you mean.  Well how things work is that there is an "Idea Wall" where anyone attending the Edcamp could come up and write down a topic of discussion that they felt passionate enough about that they wanted to have a session dedicated to it.  Then hopefully you will have enough topics to cover through the entire day with enough diversity so that people have lots of choices to pick from.  So I figured why not, so I threw a topic up on the wall for a session time.  I was not sure if anyone would even show up but that is also the catch at an Edcamp.  You may have a session that everyone wants to come to and you may have one that is not attended at all, and it is all OK.  You may have people coming in and leaving during your sessions and that is OK as well.  There are no hurt feelings and the opinions of everyone are valued and not squashed. 

I was prepared for the worst case scenario being that no one would attend my session.  I just was not sure that there would be any interest and I since this was my first Edcamp I would have been fine with no one attending.  But when the time came I was surprised that I had some people walk in to participate and the game was on.  I felt that it was a really good session with lots of discussions in it and I even got a round of applause from the few people that were there.  All in all it was a great day and I feel that I will attend more in the future and even sign up on the "Idea Wall" to present a session again.

I have a confession to share with you know.  I can now say that at one point in time I was very concerned and unsure of myself as a presenter.  Now I can say that after presenting at a number of conferences I am feeling more and more comfortable with being in front of people. 

Image provided by: @bethanyvsmith, NCSU

Wednesday, April 18, 2012

Promethean Actiview 522: First Look Part II

Now that we have taken a look at the hardware on the new ActiView 522 Document Camera (doc cam) let's take a look at the software and how it can be used with your computer and additional software.

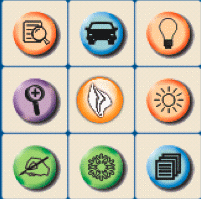
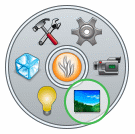
The software is ironically called ActiView to match up with the product and will look vaguely familiar after you launch it from your Start Menu, Applications folder or desktop.  Before you open the software you want to make sure that you have turned on the doc cam first.  The icon will look like the one to the right for you to click on to use the proprietary software that comes with the ActiView 522.  After you open the software you will see the icon appear on the desktop.  If you move the mouse over the icon it will open up to a 3 x 3 grid as seen here to the left.  I will briefly outline what each icon means but will also offer a link to my livebinder so that you can go and get a printable sheet with the full definitions.

In the first row you will see an Icon with a Light bulb, Car and Paper with Magnifying glass.  The Light bulb turns the dual lamps on and off.  The Car is the Auto Tune button which will focus, zoom and adjust brightness in one click.  The paper and magnifying glass displays what is under the lens in a window on the desktop.  In the second row are the Magnifying glass for you to Zoom in and out and the Sun which adjusts the brightness of the image in small increments.  The third row are the Hand, Snowflake and Papers.  The Hand opens the Annotation tools inherent to the software to allow you to write over the image being displayed.  The Snowflake will freeze the live image and the Papers open up the Advanced Menu options.


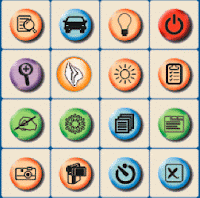
When you click on the Advanced Menu button the 3x3 grid opens up again to a 4x4 grid as seen here to the right.  There are just a few additional items here but they are the power features of the software.  Along the bottom row is the Camera Button which allows you to take still pictures and save them directly to your computer.  The Camcorder button allows you to record video and save it directly to your computer.  The button with the Circle with the Line through allows you to use the  Time Lapse photography feature.  The "X" button will shut down the software.  In the last column from top down are the Power button which will turn on and off the doc cam.  The Clipboard button shows the controls for the Audio and Video options within the software.  The the Menu button, which allows you to adjust the Camera settings.


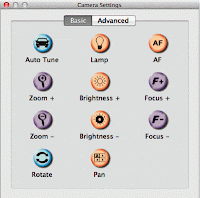
When you click on the Menu button you will have an entirely different panel pop up on the screen.  In this panel you have a Basic and Advanced toggle button.  In the Basic options are the expanded options from the 3x3 grid.  With three additions, The "AF" button to auto-focus, which can also be done by pressing the two white buttons on the sides of the lens simultaneously.  The Spinning Arrows which allows you to rotate the image in 90 degree increments from 0 to 360.  And the Pan button which allows you to scan across a projected surface in small increments in all directions without moving the neck of the doc cam. 


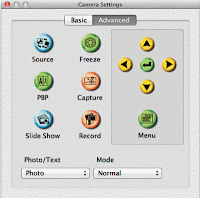
When you switch over to the Advanced panel you have the doc cam options.  Some of the buttons here are the same as on the 3x3 grid, control pad and remote.  If you have the device setup as a pass through device you click the Source button to switch back and forth between the computer and camera mode.  The PBP button allows you to display a static image that you have taken with the doc cam, that is stored in the internal memory, with the live image right next to it.  The Slide Show will display all images in the doc cam memory in sequence either automatically or manually.  The Capture and Record buttons work just like the ones on the remote control but will store content in the doc cam internal memory.  The Photo/Text drop down just adjusts the doc cam to what type of resource it is displaying.  There are four different modes you can choose from, the default is Normal.  There is Slide mode which gives you a sepia haze to the viewing area.  The Film mode shows the negative aspect of the image.  Lastly there is the Microscope mode which allows you to hook the doc cam lens directly to the ocular of a Light Microscope with the provided adapters.

Now that we have taken a look at the ActiVew software I have an additional tidbit of information for you about the use of the ActiView doc cams with the ActivInspire software.  When you have the doc cam turned on but are not using the software you can open the ActivInspire software and go the Insert Menu at the top of the screen and select the Launch ActiView option.  When you do this you will see the Same Icon as you do when you launch the ActiView software from the computer but the icon is round.  When you hover over it you will see an expanded ring with option buttons.  Some of the buttons are the same as the free standing software.  The Photograph allows you to toggle on and off the display of what is under the doc cam. The Camcorder allows you to record video and use the Time-lapse feature.  The sprocket are your tools.  Zoom, Auto tune, Capture and On/Off Buttons.  The Hammer and wrench give you those Advanced features.  Brightness, Rotate, Camera Modes, Photo/Text and Focus options. 

Now that you have a basic understanding of the features of the software now you can take a look at my Livebinder to see how you can use the ActiView 522 in your classroom.  One quick way to integrate the doc cam is to use it with the ActivInspire software but you can also insert the images directly into MS Office products as well.  I have added a downloadable pdf to the livebinder so that you can see how this is done.  I have lots of web resources that will provide you with some insight into how you can use the doc cam in different subject areas as well as those specials classes too.  Ways it can be used in Professional Development and for behavior modelling.  Not only can you use the doc cam as a Digital Camera, Camcorder but you can also use it as a Webcam with many different webtools.  If you use it with Skype you will have to download version 4.2 which is the last stable download that will allow the use of the doc cam as a webcam through the Skype software.  I have even added in some information on how the doc cam can be used with QR codes and Augmented Reality.

Here is the Livebinder link.
Document Cameras

Images Created with ActivInspire Area Snapshot Tool

Thursday, April 12, 2012

Promethean ActiView 522: First Look Part I

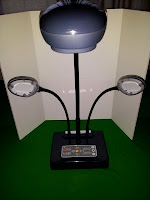
I recently received the new Promethean ActiView 522 Document Camera(doc cam) and have been putting it through its paces.  After having the document camera for a while I have done a lot of work seeing how it stacks up to the previous 322 series and against other branded models of document cameras on the market.  I have worked through the software while hooked directly to a computer as well as having it setup with just a digital projector and even as a pass-through device to give you my review.

The 522 is the latest model to come out of the Promethean ActiView line up.  This unit boasts a longer goose neck than the 322 series to allow for more mobility when adjusting the Lens head to objects that you are displaying.  This doc cam adds an additional light for greater visibility in low light situations.  The 522 also has and upgraded square base to allow for greater stability.  One significant modification in the design of the 522 doc cam is that the positional alignment has been changed.  An object being displayed must be parallel to the base in order for it to show as right-side up in the projection.  The base also has an upgraded hard drive for storage of up to 128 images at 1024x768 resolution.  The Lens has also been upgraded to the V2 high definition series for better clarity and improved zoom and display capability.

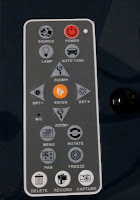
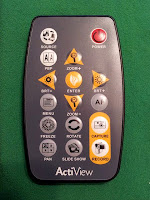
You have a Remote Control as well as on the base you have a fully integrated keypad that allows you to control the document camera while using it as either a stand alone device or while it is hooked up to a PC or Mac system.  Along the top row of the keypad are the Power and Source buttons.  The Source allows you to switch back and forth between the computer and projector when the unit is set up as a pass-through device.  On the second row are the Lamp and Auto Tune buttons.  Pressing the Lamp button turns off both lights at once and this only an on/off feature.  The Auto Tune(Car) button will adjust Brightness, Zoom and Auto Focus all at once.  The Middle of set of buttons are the Zoom In/Out, Brightness -/+ and the Enter Key.  You will also notice that some of these buttons have arrows underneath them.  When you see these types of buttons you will have to press another button in order to activate this feature.  In the same area of the panel is the built-in microphone.  The next row of buttons are the Menu and Rotate options.  The Menu button only works when you are in the Document Camera Mode displaying through the digital projector.  The Rotate button will adjust the image in 90 degree increments from 0 - 360.  The second to last row has the Pan and Freeze button.  Freeze does what it says and locks the image in the display so that you can either change the information under the doc cam with out seeing the activity in the display area.  The Pan button allows you to put larger than 11x14 item under the lens which allows you to then use the Arrow keys to Pan across the object in small increments without moving the Lens neck.  On the bottom row are the Capture, Record and Delete buttons.  Capture allows you to take a picture of the displayed image same as a digital camera.  The Record button allows you to use the built in microphone to create a video of what you are doing under the doc cam lens.  The Delete button removes the stores images and video from the internal hard drive housed within the base of the doc cam.  The remote control has most of the same action buttons as the base, albeit in a different configuration, but there are a few items removed and some new buttons added.  There is the PBP button which allows you to display both a static image stored in the base along with the live image right next to it.  The AF button which allows you to Auto-focus, and the Slide Show button which allows you to display the content stored on the doc cam hard drive and use the arrow keys to move between the items similar to that of a digital presenter.


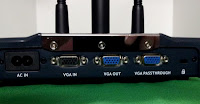
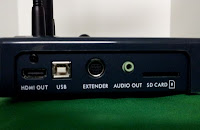
On the back of the base you have the Power in and VGA inputs and outputs.  You have the option here to set up the device as a pass-through with a digital projector and computer where the doc cam acts as a switch box between the two.  Which allows for the use of the Source button on both the doc cam base and remote control.  On the top side of the base are some additional plugin options.  One is an HDMI connector that will allow you to plug the doc cam into any HDMI device.  You have the USB connector that allows you to hook up to a computer so that the doc cam can just be a usb device only that will utilize the proprietary software packaged with it on the PC or Mac.  You have an 8-pin connector and an Audio Out to attach to an external set of speakers so that when you play the recorded video you can hear the sound as well.  And lastly you have the SD Card slot that allows you to expand on the internal storage within the doc cam base.  You can also setup through the Menu options for images and video to be stored directly on the removable SD card instead of the internal drive.

Now that you have the particulars of the physical hardware in my next installment I will go into the included software and some uses in the classroom.  Look for part II coming soon.

Interactive Sentences Unsing ActivInspire

Have you been trying to figure out a way to engage your students a little more while they are in their writing centers creating sentences?  Why not use your ActivBoard and ActivInspire to make creating sentences a little more fun.  There is a tool called Append Text that will allow your students create sentences by Appending (adding text) after a sentence starter word.

To set this up you will need to open ActivInspire and on a new flipchart create your list of words that you want students to use to create sentences.  Then in a blank area of the page put your sentence starter word, remember to put a space after it.  Move the words on the screen in an area where they are not in the way of the sentence they are creating.  You can also use objects to provide a visual component for your students.  This will allow you to reach from Pre K students and up.  

For the rest of the words: Watch the video to see this in action
  • Open Action Browser (View - Browsers, or CTRL+B)
  • Select the word
  • choose Append text from the Action Menu
  • Choose the Target Text ellipse button to select the sentence starter.
  • In the Text box type in the word you originally selected, "make sure to add a Space after the word"
  • Click Apply Changes button


Now you are finished with the set up.  You should now save the flipchart page so that you have a clean page copy for the students to work from.  This allows you to use the Reset Page button to clear what has been selected after each student comes up to write their sentence.

Monday, April 2, 2012

Quick & Easy Mapping Made Easy

While attending a conference recently I was in a workshop that was offering a lot of resources for Social Studies and Science and I was introduced to what I thought was a really great website.  As soon as I saw the website my ADD kicked in and I started thinking of all of the ways that it could be used for Social Studies mostly and as well for the other curriculum areas.

The site, oh yeah I have not told you yet, is Batch Geo.  This site gives you the ability to quickly create an interactive map from Spread Sheet data.  Yes you can create a map from a simple data sheet.  As long as there is an address field you will be able to create a map in three steps, yes three steps.  After you go to the Batch Geo website step one is to get your data sheet and copy and paste the information into the text box in the middle of the screen.  They even have a downloadable template which you can get so that you can just fill in the blanks with whatever information you want to map.  Step two (optional) is where you can set some parameters for the map contents.  Step three is just you pressing the Map Now button so that the website will create the map from your data.  Now depending on how much information you paste into the window will depend on how long it will take for the site to convert the data into a map.  It really does not take that long, I pasted in a five column by eighty row spreadsheet and it still took less than a minute total time to create the map.

After the Map has been created you have the option to Save & Continue which allows you to give the map a title, description, email address and to list as public or unlisted.  Once you Save the information you will be sent an email with the information about the map you have just created.  In the email that you receive is a weblink to the map, a link that will allow you to edit the map afterwards and the full embedding code so that you can place your map into a website, wiki or blog like I have done below.


View Colleges of NC in a full screen map

So now that you know how to create the map what can you do with it?
Here just a very few things that I thought about during the conference session:
  • Time lines
  • War Battles
    • BC
    • Medieval Times
    • Revolutionary
    • Civil War
    • WWI, WWII
  • Author, Scientist, Famous people time lines
  • Virtual Field Trips
  • Literature Trips
  • College Planning for HS Seniors
  • Disaster Events
Give it a try and see what you think about the website and then share some more resources on how this can be used in your classroom by commenting on this article.

Friday, March 23, 2012

Green Screening Made Easy

OK, so most of you know from reading my blogs or if you have met me know that I am not a Mac person.  I am the farthest thing from being one it seems with the educational company that I keep.  But I have to say that over the past few months I have been working on some small video projects especially with Green Screens and have been having a lot of problems with it on my PC.  So a few weeks ago when I was at my State technology conference I sat in on a workshop entitled Green Screen Cafe which has made me think it could be time to switch over to another platform for video editing.

The presenters were from an area school system that have adopted the Mac platform for creating and designing some really unique projects using Green and Split Screening tools in the classroom.  From what they discussed the students really liked the projects and have enjoyed doing them all year.  Two of the presenters were from an Elementary School and the third was from a High School.

They started out the presentation saying that it does not take very much to start green screening video work.  Three things are needed to get started.  A Green Screen, video camera and iMovie (Apple product, but you know that) and that is all you need to get going they said.  They did offer up some suggestions for low cost alternatives for green screen and video cameras. 

Green Screen Alternatives:
  • green bed sheet
  • green curtains
  • paint a wall green
Video Camera
  • flip cameras
  • cell phone cameras
  • document cameras
So I started thinking to myself in this room of mac users, I am totally in over my head until they started to show us how to create a quick green screen movie with iMovie.  I was amazed at how fast they did it, just minutes and we had a completed product.  They started out by telling us that there is one setting that has to done in order for things to work correctly.  In iMovie you have to change the General, Preferences list and put a Check in the box for Show Advanced Tools - Green Screen.  This allows the Green Screen options to show in the iMovie options when editing video.

So they started out by telling us that we need to pull in the background image first, that will show through the green screen.  Then overlay the video, with the green screen back drop, on top of that image.  Make any necessary edit to the clips and there you go.  An instant green screen video in under five minutes.  Now they did say that the videos that you will be using need to be in .mov format but that is easy if you are pulling from another video source.  Just use Zamzar or any other of your favorite file conversion sites to convert the video into this format.  And you can get background images and/or video using a Creative Commons search if you do not have your own images.

With all the pains I have gone through with the PC side of creating green screen videos, I might now have to go out and take a look at iMove and maybe possibly purchasing a Mac product for myself to use.

So what are some ways that you can use this in education?  How about these:
  • Planets/space
  • create virtual tours of foreign lands
  • lighthouses
  • county-wide read-a-longs
  • historical skits
  • Christmas around the world
  • meet your teacher
  • election videos
  • candidate interviews

Thursday, March 15, 2012

A New Twist on Google Maps

While at our state technology conference last week I sat in on a session discussing new ways that you can use/apply Google maps across the curriculum.  I thought it was interesting and was not sure what to expect but I wanted to see if there was something new going on that I did not already know.


I already knew that I could go into Google Maps and get directions and could both get a web link and embed a map into another website using the code.  But I had not gone through the process of creating my very own personalized map.  I thought it was very interesting and fun to be able to create my own map with the places I wanted to see in it.  I worked along with the presenter and created a map of vacation locations that I have been in the past number of years.  As I was doing this I started thinking of the many different ways that this could be applied to the classroom at all levels.  Now there is a catch in this and that is you have to have a Google Account setup ahead of time so that you can log into and create your map.  I setup a generic account and was able to follow along with the presenter and was caught up in a manner of minutes.


When you log into Google, click on the Maps button in the browser toolbar.  This takes you to the familiar maps screen where you can zoom in to a location and all the way down to the Street View, which I talked about in a previous blog.  First click on My Places then Click the Red Create Map button and enter in a Title for this map and a brief description of what the map will be showing.  In the map pane you can zoom into the area of the map you will be using and then utilize the Add Placemark and Draw Line option buttons to create the points on the map that are of interest.  

Select the Placemark button and choose a spot on the map and click, you will now have a box that allows you to enter in a title and description of the selected location.  You can add in as much information as you want including links and images if needed.  Once you have added in your points of interest you can then use the Line Tool and draw lines from a starting location to the final destination.  After you have placed all of your markers and created a pathway between all the points, just save the the map you have created.  

You can also choose the Collaborate button to grant others the ability to add to and take away the location points on your map.  When you have completed all of the edits of your map, click the done button and you have your very own self-created map.

Now that your personalized map is created you have the choice to make it either Public, for anyone to see, or Unlisted, in which you will share the map with only those you want to see it. You can then click the Link button and either copy the URL address to send out or you can Embed the map code into a website, wiki, or blog to share.  Another point to know is that when you are in the customize area there is an Interactive Tutorial that takes you through the whole process of setting up a map from start to finish.
So now that you have learned how to create a customized map in Google Maps what do you do with it now?  How can it help you in the classroom?  Here are a few suggestions on how to use them in your classrooms. (adapted from presentation)


Science:
  • Natural disasters: earthquakes, hurricanes, tornadoes, volcanoes
  • Famous scientists
  • Museums
  • Endangered species
  • Habitats/biomes
  • Plotting field trips (virtual/in person)


Social Studies:
  • Civilizations
  • Tribes
  • Military battles/movements
  • Explorers
  • Exploration maps
  • Exploring my city/hometown
  • States and Capitals
  • Civil Rights
  • Innovators
  • Underground Railroad
  • Alaskan Iditarod 

English:
  • Famous Writers
  • Literature Trips
  • Ghost Stories
  • Haunted locations
  • Flat Stanley Novels

This is just a sampling of what you can use the Customizable Google Maps in your classroom.  You may have other thoughts of ways to use it and that is great, please share additional information in the comments area of this blog. 


images from Google Maps using Promethean Image Capture Tool

Monday, March 12, 2012

Tweeting to Disaster

I, to make a bad joke, ran across this article this morning about the upcoming 100th Anniversary of the sinking of the Titanic.  The History Press has launched a new Twitter account to chronicle the days leading up to and including the faithful night that the UN-Sinkable ship sank in the waters of the North Atlantic.

You can follow the timeline through the hashtag #TitanicVoyage (@titanicrealtime), and even from some of the people that were a part of the launch like #crew, #engineering, #captain to hear their thought and accounts of the events that led up to that now infamous night of April 15, 1912. Currently the timeline was setup on March 10, 2012 to begin the chronicling of the events.  There are just a few tweets out there now from the captain, crew, engineering and officer but as the time gets closer to the launch date we should start seeing the timeline fill up.  Currently there are almost 13k followers of the site.

This could be a great lesson starter for you Social Studies classes where the students can follow along with the feed as things are happening to see what it would have been like if Twitter was around during that time for people to be able to send out updates as they were happening.  We find it so often now with other natural disasters that we are getting updates from Tweets faster than we can get news crews into areas.  It will be very interesting to see how things unfold through tweets over the next month.  Maybe to see if there will be tweets coming from what would be passengers as well as the crew for their thoughts on what will, or rather has happened.

** Update **
I just got some new information that I needed to add to this post.  The information that is being Tweeted out is, and will be coming directly from the ships log books.

Friday, January 27, 2012

How to Find Longitude and Latitude in Google Maps

A conversation started earlier today where one of my co-workers asked about resources to help students find and figure out how to determine Latitude and Longitude.  It made me think back about some conversations that I had with some Kindergarten teachers regarding Google Earth and it dawned on me.  You can set Google Maps to show your Latitude and Longitude with just a few simple clicks on the screen.

I had forgotten all about the ability for Google Maps to display this information and it is very simple to do.  Once you have opened up a Map and moved into the location that you would like to find the Latitude and Longitude for you will Right Mouse click to see the menu.  In the Menu Click on What's Here?  When you do this you will see a Green Arrow pop up on the Map.  When you hover over the green arrow the Latitude and Longitude will display for the location.  You then can perform any of the normal options that Google Maps offers you users.

Here is a quick video that shows you how to determine the Latitude and Longitude on the Map.


video created using Google Maps and
ActivInspire Recorder tool

Thursday, January 12, 2012

You Have Their Attention When This Happens...


The other day I was having a training session with middle school teachers who are moving into their new building in a couple of days on the equipment they now have access to in their classrooms.  We were talking about all of the new interactive tools they have in their classrooms that they can use with their students when I had a teacher speak up and say what is that?  I was not sure what they were referring to so I asked them to show me what they were talking about by using the Interactive Tablet to click on the Icon in question.

We were looking at ActivOffice, which is an add-on productivity pack for MS PowerPoint 2007, when the teacher noticed in the floating toolbox an Icon that said READ.  I said for them to go ahead and click on it to see what it would do.  The Icon opened up the Ticker Tape Tool which started the scrolling text across the top of the page.  I looked back at the teachers in the room and more than half of them were looking up intently at the tool they had discovered and were all asking questions about how it worked.  So in the midst of one training we went turned in a completely different direction to what a co-worker calls a "Teachable Moment."

I went into a quick discussion on how the Ticker Tape can be used in conjunction with ActivOffice and a PowerPoint to share even more information with the students.  The teachers can setup the ticker tape with any type of information from Science terms, Social Studies dates and places to Math and English terms.  The Art teacher spoke up with a "What about me?"  I responded with enthusiasm that all kind of information can be shared from the names of different artists, sculptors and painters to go along with the images of their works displayed on the PowerPoint.  Music teachers can also benefit from the use of the ticker tape with Lyrics to songs, famous musicians and terminology.  All which can be shared with the students right over the current displayed information.

We even got into a discussion on how they could put their Subject area Essential Questions, morning work, homework assignments, upcoming school information, project information and a myriad of other general announcements.  All which could then be used over and over again because they have the ability to save those ticker tapes to their local drives, staff share, media or even personal thumb or external hard drives for future use.

All of the teachers were talking and whispering of different ways they could use the Ticker Tape and even though we had gone in a different direction from the planned training I felt that they had gotten more out of that 5 minutes and would be able to use that information immediately to share information with their students on the first day in their new classrooms.

As a final thought don't forget that if you have ActivInspire and an ActivBoard you can also use the Ticker Tape tool to share information with your students as well.

A New Way to Study Geography

I was looking through Promethean Planet recently and discovered that they have now joined forces with a new Partner resource called The Royal Geographical Society(RGS).  "This group was established in the early 1800's to help support education, research and fieldwork in the study of world geography." 

The Royal Geographical Society offers a wide range of resources to help students in the classroom to learn about the different aspects of world geography through online resources and fieldwork studies for Elementary through Post-Secondary education.  A recent fieldwork study was their work on the production of resources for the study the Continent of Antarctica.  As you read more about the Partner Resources on Promethean Planet from the RGS  you will have access to their documents and resource packs on the geography of Antarctica.Plus they have a really nice flipchart that you can download and use in your classroom.


You can also visit their parent site rgs.org to see even more research and resources available for the classroom.  They have separated their site into resources for Teachers, Students and even Parents so that the information is available to all participants who are using their site.  There are many more resources available on their website to mention here.  Take a look for yourself to see how RGS can help your students gain a better understanding of World Geography.