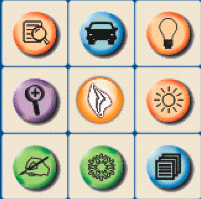
 In the first row you will see an Icon with a Light bulb, Car and Paper with Magnifying glass. The Light bulb turns the dual lamps on and off. The Car is the Auto Tune button which will focus, zoom and adjust brightness in one click. The paper and magnifying glass displays what is under the lens in a window on the desktop. In the second row are the Magnifying glass for you to Zoom in and out and the Sun which adjusts the brightness of the image in small increments. The third row are the Hand, Snowflake and Papers. The Hand opens the Annotation tools inherent to the software to allow you to write over the image being displayed. The Snowflake will freeze the live image and the Papers open up the Advanced Menu options.
 When you click on the Advanced Menu button the 3x3 grid opens up again to a 4x4 grid as seen here to the right. There are just a few additional items here but they are the power features of the software. Along the bottom row is the Camera Button which allows you to take still pictures and save them directly to your computer. The Camcorder button allows you to record video and save it directly to your computer. The button with the Circle with the Line through allows you to use the Time Lapse photography feature. The "X" button will shut down the software. In the last column from top down are the Power button which will turn on and off the doc cam. The Clipboard button shows the controls for the Audio and Video options within the software. The the Menu button, which allows you to adjust the Camera settings.
 When you click on the Menu button you will have an entirely different panel pop up on the screen. In this panel you have a Basic and Advanced toggle button. In the Basic options are the expanded options from the 3x3 grid. With three additions, The "AF" button to auto-focus, which can also be done by pressing the two white buttons on the sides of the lens simultaneously. The Spinning Arrows which allows you to rotate the image in 90 degree increments from 0 to 360. And the Pan button which allows you to scan across a projected surface in small increments in all directions without moving the neck of the doc cam.
  When you switch over to the Advanced panel you have the doc cam options. Some of the buttons here are the same as on the 3x3 grid, control pad and remote. If you have the device setup as a pass through device you click the Source button to switch back and forth between the computer and camera mode. The PBP button allows you to display a static image that you have taken with the doc cam, that is stored in the internal memory, with the live image right next to it. The Slide Show will display all images in the doc cam memory in sequence either automatically or manually. The Capture and Record buttons work just like the ones on the remote control but will store content in the doc cam internal memory. The Photo/Text drop down just adjusts the doc cam to what type of resource it is displaying. There are four different modes you can choose from, the default is Normal. There is Slide mode which gives you a sepia haze to the viewing area. The Film mode shows the negative aspect of the image. Lastly there is the Microscope mode which allows you to hook the doc cam lens directly to the ocular of a Light Microscope with the provided adapters.
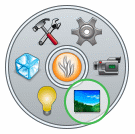 Now that we have taken a look at the ActiVew software I have an additional tidbit of information for you about the use of the ActiView doc cams with the ActivInspire software. When you have the doc cam turned on but are not using the software you can open the ActivInspire software and go the Insert Menu at the top of the screen and select the Launch ActiView option. When you do this you will see the Same Icon as you do when you launch the ActiView software from the computer but the icon is round. When you hover over it you will see an expanded ring with option buttons. Some of the buttons are the same as the free standing software. The Photograph allows you to toggle on and off the display of what is under the doc cam. The Camcorder allows you to record video and use the Time-lapse feature. The sprocket are your tools. Zoom, Auto tune, Capture and On/Off Buttons. The Hammer and wrench give you those Advanced features. Brightness, Rotate, Camera Modes, Photo/Text and Focus options.
 Now that you have a basic understanding of the features of the software now you can take a look at my Livebinder to see how you can use the ActiView 522 in your classroom. One quick way to integrate the doc cam is to use it with the ActivInspire software but you can also insert the images directly into MS Office products as well. I have added a downloadable pdf to the livebinder so that you can see how this is done. I have lots of web resources that will provide you with some insight into how you can use the doc cam in different subject areas as well as those specials classes too. Ways it can be used in Professional Development and for behavior modelling. Not only can you use the doc cam as a Digital Camera, Camcorder but you can also use it as a Webcam with many different webtools. If you use it with Skype you will have to download version 4.2 which is the last stable download that will allow the use of the doc cam as a webcam through the Skype software. I have even added in some information on how the doc cam can be used with QR codes and Augmented Reality.
Here is the Livebinder link.

No comments:
Post a Comment