Showing posts with label Lumens. Show all posts

Monday, January 6, 2014

First Look: Lumens DC-125 Document Camera

Let's take a look at the new DC-125 Document Camera from Lumens.  I recently got the opportunity to take a look at this little wonder.  Yes this device is smaller than its other family members from Lumens, close to one half the size of the others in the line.

Now just like the rest of the model lines from Lumens over the years the DC-125 also has a flexible armature, commonly known as a "Flex Arm" design, that allows for ease of movement so that you can really get up close and personal with the objects that you viewing.

When I unpacked the DC-125 the first thing I noticed is that there was no Infra-Red eye on the front of the base.  So no remote control is needed in order to run this model.  That's great, one less thing for me and probably some other to lose.  I know in talking with some educators they are always concerned about keeping up with remote controls.  Also the base is simplified with only four buttons.  You will see Lamp, Freeze, Capture and Auto Tune buttons but one button that you may be familiar with.  Figured it out yet... yep no power button.  That's because you do not need to have one to use this model document camera.  One other main factor that you will notice on the base is only one connection point.  A simple USB connector to the computer.  This model does not even have a power cord with it, everything is run through the USB cable.  All power, video and sound, yes I said sound.  This model has a built in microphone and an audio driver that allows the computer to utilize the document camera as an external microphone.  I will talk more about that later.

The lens is another change from the norm, you will notice that there are no moving mechanical parts.  This model only has a digital zoom lens on it which makes for easier focusing of the lens on the objects which are being looked at.  You will also notice that there is a simple LED light with no additional light arm as seen in other models from Lumens.  On the back, or top, of the lens is where you will find the built in microphone.  You will also noticed that there are a couple of notches next to the lens that will allow you to place an connector on the lens so you can use the device with a microscope.

So the Good on this little gem is that what you see is what you get.  Even though there does not seem to be a lot to the DC-125 it packs a punch.  You still have all of the features that its larger family members have with less you have to deal with.  In this case simpler is better, even using the Ladibug 2.0 software is easier and more straight forward to use.  It all seems to be put together with the teacher in mind, just plug in the USB cable and turn on the software that's it nothing else.

Another positive for the DC-125 is its ease of integration with other computer software.  I was able to successfully use the device with different whiteboard software loaded on my computer.  I quickly was able to use the device with web-based sites that both allows for audio and video integration.  Even with Skype, which has been an issue since Skype upgraded beyond version 4.2.  With the DC-125 I plugged it in turned on Skype and not only did I get the video but also the audio.

One Bad thing I noticed on the DC-125 is that the built in microphone is located on the top of the head unit. The placement may not be the best if you are going to use the camera recording feature because the microphone will be pointing away from the person talking if you have the lens turned upward.  A small design change would put the mic in the base for easier accessibility.  All in all the DC-125 is a well rounded document camera that is very easy to use with not a lot that can go wrong.

Wednesday, April 24, 2013

The Good, Bad and Ugly on Ladibug 2.0 Software

2.0 or not 2.0 that will be the question that is answered hopefully at the end of this Blog post.

Recently the Lumens company has updated its software for its famous Ladibug brand document cameras (Doc Cam).  When Lumens decided to update from the earlier Queue to Ladibug software it was a huge transition for users to get accustomed to, but was also leaps ahead in the features that it offered.  Now recently, the Ladibug software has gone through another transition as it has upgraded from version 1.1.. to version 2.0.3.

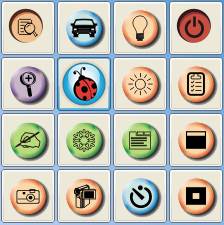
Let's take a look at the changes and talk about the Good things.  One of the obvious changes that you will notice is that when you activate the software and hover over the Ladibug Icon you will only see a 4x4 grid.  If you remember in the earlier version you hovered and saw a 3x3 grid and then had to click the Advanced button to see the 4x4 grid.

On the 4x4 grid there have been a couple of new feature icons that have been added for you to use along with the ones that you have become accustomed to.

One of them is the Mask Mode, which is similar in look to a cover shade over the information. If you remember putting a sheet of paper over the overhead machines to block certain information you were sharing this will be the same, just through the software.

The other is the Spotlight Mode, which allows you to focus in on an area of the screen while blocking out the rest of the viewing area.


The biggest change that you will notice when you turn on the software that is completely different on version 2.0.3 is in the viewer window when you click the Display Live Image button.

You will now see something extra, the Thumbnail Viewer, which is attached to the left side of the viewer window that offers some additional available options that you have not had the ability to do before.


Any images that you take with the Camera Button will display in the thumbnail viewer for you to use.  To display one of the images, click the Thumbnail you want to use.  To go back to the live image hover over the Ladibug Icon and click the Display Live Images button again.

Some of the other features on the toolbar are:

  • You can Save the Image anywhere on your computer.  
  • Open a Directory of Images from your computer, CD-rom, Thumb Drive or other removable storage device to display inside of the Ladibug software. 
  • You can Delete items in the viewer that you do not want.  
  • You can also email images directly from the Ladibug software 

Now you know whenever there is good I always seem to find something bad to go along with it.  Well the only thing that I could find can count as both bad and ugly at the same time.  The Delete feature is the culprit that has caught my attention.  I said earlier that you can open a Directory of images and bring them into the document camera and use them in the software.  Well you will need to make a copy of all of the images first before you open them in the Ladibug software.  What happens is that the software does NOT create a duplicate of the image, it attaches to the original.  Why is that bad you may be asking?  Well it comes in when you want to Delete an image you no longer want to use.  If you Delete an image that you have pulled from a Directory.  It is permanently deleted from the original location.  Yes gone for good, I learned the hard way believe me, I lost an image that I did not have a duplicate of.  

So all in all the software update is great and so much more user friendly that its predecessor with the exception of the Delete feature.  I would have to challenge Lumens to work on fixing the system so that it will duplicate the images when you open a Directory of photos to use in the software. 

Thursday, November 10, 2011

My First Look at the Lumens DC190


Finally I have recently gotten to really sit down and take a look at the new (well almost new) Lumens DC 190 document camera(doc cam) that has recently replaced the DC 166 that hit is EOL cycle.We have been using the DC 166 model for a couple of years in our school district and will now be transitioning over to the newer design model.

At first glance you do not see anything different in the look and design of the doc cam, it is their termed "Ladibug" design series.  Upon further inspection there are two noticeable items that are different in this design over earlier versions.  One is that there is a USB plug-in  instead of the SanDisk port of the earlier 166 model.  The other difference is that there is a microphone built in the front of the base now so that you can include sound with your video recordings in the camera only(presenter) mode.

Another big change in the DC 190 over its predecessors is the redesign of the remote control.  Now you still have the standard buttons on the base of the doc cam; Capture, Playback, Zoom +/-, Power and Menu.  However there is a new look to the remote.  They have gone back to the basic black color design, which is great for those who are color blind (like me) because it makes the buttons and names stand out.  There are a couple of changes on the remote control that need to be mentioned so that you know where to look now versus earlier models.  The Source button is now located below the Power button, a big departure from having it in the top left which is now the Freeze button.  The Menu button flips over to the opposite side of its current row.  The Book button has now been replaced by Pan, which is a more appropriate name to describe the action that is associated with the buttons actions.  It still works the same way, you press it once to get into the Pan mode and then again to exit.  A huge step ahead of it previous version is what use to be the PBP button which is now PIP.  Yes it should sound familiar because it is Picture in Picture.  You have the live image in the background and then the static image in the bottom corner that you can choose from by using the selector (arrow) buttons to view the available images.  There is a new edition to the remote and that is the Mask button which similar to how you placed a piece of paper over your old overheads.  About 3/4 of the screen is darkened out on the first click, the second then puts a veil over the whole page except for a square in the middle of the screen.  You can then use the arrow keys to move the square around on the screen similar to a spotlight feature or move to reveal.

Another nice feature of the DC 190 is that there is now an LED light that is under the Head unit.  Now depending on the ambient room light you only had the option to either have the light source on or off.  Now you can select the LED light so that you still have an additional light source that is not as bright as the normal lamp light that has been on the Ladibug design for years.  The LED light source is just below the lens unit when you raise the head up at straight.  You can toggle between the modes using the Lamp option button in the Ladibug software.

Stay tuned for part 2 of my look at the Lumens DC 190 where I will go into the Software changes and then give you a break down of the good and bad that I have seen in the new design.